Pages

Thursday, July 30, 2020

Paneer Butter Masala | Restaurent and Dhaba Style | Tips To Make Perfect Creamy Gravy


I just happened to make this, because I wanted to use an open tub of fresh cream. Yes Paneer Butter Massala cannot be made without cream. If you want authentic real restaurant style gravy I will say please don’t skip cream.

How Paneer Butter Masala does taste like?

Very lightly spiced, tomato based gravy; thickened with cashews, cream and butter (ofcourse!). It is an indulgent dish, something in which you shouldn’t count calories or fat. For same reason it is also called as Paneer Makhani or Makhani Vale Paneer.

How to make restaurant style Paneer Butter Massala at home?

Yes, it is very easy to make restaurant style Paneer Butter Massala at home if you keep in mind the following tips.

-Do not overboard the gravy with spices and masalas. It has to be subtle. So if you use kitchen king masala power or any other spice powders, then stop it.

-Use nuts to thicken the gravy. Cashews are the best choice. You can use almonds too, but in that case soak the almonds and remove the skin. Again, do not go crazy with nuts too; you do not want super thick gravy.

-Put the paneer in the hot water and let it sit there for 20 minutes. This will soften the paneer and you will have that melt in mouth paneer cubes.

-Use butter and cream (full fat). There is no alternative for these too if you want good true paneer butter massala.

-To get that beautiful colour, use Kashmiri red chilli powder.

-Lastly use garlic, onion and tomatoes also in limited quantity. You do not want any of this to overpower the whole gravy.


How to make Dhabha style Paneer Butter Massala at home?

Okay, so those of you don’t know, dabha is a roadside restaurant in India. You will see so many dabhas on the highways, serving local cuisine. They are most commonly found next to petrol stations, and most are open 24 hours a day.

To make dabha style paneer butter masala you need to apply dhungar method or coal method. Here basically you heat up a piece of a coal till its red hot. Then place this charcoal in a steel bowl and place the bowl on the top of the paneer gravy. Add around ½ teaspoon of ghee on the coal and you will see smoke or fumes coming out it, immediately cover the pan with the lid and let it sit there for 2 minutes. Then remove the bowl and discard the coal. This method will give you that smokey paneer effect you get in the dhabha.

Is Paneer Butter Masala Healthy?

No absolutely not. Unlike other paneer dishes such as palak paneer or mutter paneer this paneer dish is loaded with calories and fat. It is not everyday kind of a paneer subji either –it is a royal treat that you can have once in a while.


What are variations to Paneer Butter Masala?

Over the years, trying paneer butter Massala at various places in india, UK and many European countries I have learnt some variations and I would like to share that with you all.

You can add makhane (fox nuts) in the gravy and it tastes good with paneer.

I have seen restaurants even adding peas (matar) with paneer gravy and it was a good twist too.

But my most favourite combination has been chunks of bell peppers in the paneer makhani gravy and in my recipe I have added it. (Feel free not to, but I promise there is something so magical about this variation).


Let us move to recipe now.

Ingredients:

2 tablespoon oil

1 bay leaf/tej patta

2 green cardamom/elyachi

½ inch cinnamon stick/dalchini

5-6 cloves garlic/lehsun, roughly chopped

1 inch piece of ginger/adrak, roughly chopped

1 large onion/payaz, roughly chopped

3 large tomatoes/tamatar, roughly chopped

7-8 cashews/kaju

4 tablespoons butter

½ teaspoon kashmiri red chilli powder

½ teaspoon garam Massala

¼ teaspoon turmeric powder

½ teaspoon red chilli powder

¼ teaspoon black pepper powder

1 tablespoon coriander powder

1 teaspoon sugar

Salt to taste

¼ cup cream

Water as needed

250 grams paneer chopped

1 capsicum chopped into cubes

2 teaspoons kasturi methi

1 tablespoons coriander leaves, finely chopped.

Method:

Heat oil in a pan. Add bay leaf, green cardamom and cinnamon. Let it sit in oil for 20 seconds. Reduce the heat to slow.

Add in chopped garlic, ginger and onion. Sprinkle ¼ teaspoon salt and cover it with the lid. Cook till onions turn soft and there is no raw smell.

Add tomatoes, cashews and around ¼ cup of water. Cover and cook again till tomatoes release the oil and it becomes soft and mushy.

Let the tomato mixture cool down and then grind it into smooth paste.

Heat 2 tablespoons of butter. Throw the tomato mix in the butter. Add in it kashmiri red chilli powder, turmeric powder, coriander powder, red chilli powder, black pepper powder, garam masala and salt to taste. Mix it all well. Add ¼ cup water. Cover and cook again for 5 minutes till you gravy bubbling up and leaving oil on the sides.

After 5 minutes, slowly add in the cream and sugar. Mix and let it cook covered for 7-8 minutes. You must see shiny creamy gravy. Have a quick salt test to see if you need anything.

In the meantime on a separate pan, heat ½ teaspoon butter and sauté paneer cubes till you see some light golden colour on its skin (do not over roast the paneer). In the same pan also roast bell pepper (capsicum) till you see some cooked or burnt spots on its skin. Set both aside.

Throw in paneer and capsicum in the gravy. Add ¼ cup water. Let it simmer covered on slow heat for 5 minutes.

Finally add in kasturi methi and coriander leaves.

Serve with dollop of remaining butter on the top. And swirl of some fresh cream.


Wednesday, July 22, 2020

Naan | No Yeast | Instant Naan | Chilli Garlic Naan | Naan on Tawa/Pan | Stovetop Method


Naan Bread and I are sure there are tons of recipes of it all over the internet and it must very confusing to decide which one to use. Well, to be honest it all depends on what your needs are. To elaborate the statement; do you want Naan to be without yeast or maida (all purpose flour). OR you want the naan to be cooked in oven or stovetop (gas/hob). OR you don’t have much time and you want an instant naan recipe. OR you want a healthy version let’s say whole wheat (chakki atta) naan.

So as mentioned, there are so many variations of naan recipes from the ingredients used to the method of cooking. I have made all kinds of naan at home but never shared the recipe, because there are so many kinds of recipes already on the internet. For me it all started when I shared this post of Dal Makhani and Garlic Naan on Instagram and people started asking for the recipe.


This naan is made from scratch and is yeast free (so no yeast) but I used yogurt (dahi/curd) instead and is made using half and half of all purpose flour (maida/plain flour) and whole wheat flour (our chapatti ata like Pillsbury or ashirwad). I wanted to keep the dinner as fuss free as possible so I made it on the pan/tawa and then roasted it on stovetop to give that tandoor or restaurant kind smokey taste and flavour.


Just by using this simple and basic naan dough recipe you can make so many variations of naan. Use chopped garlic to make garlic naan. Or green chillies to make chilli naan. Or both chilli and garlic to make Garlic Chilli Naan. You just need to brush some butter on the hot naan and there you have Butter Naan. Sometimes I also like to use mint and coriander leaves to get that restaurant style feel. Since naan is so widely popular all over the world now, I have seen Italian twist also given to naan by adding pesto, fresh or dried Italian herbs such as oregano, basil and chilli flakes.

What to eat with naan? I would say any paneer dishes goes really well with naan. But you can also pair it up with hummus and yogurt dips. Or like me, I love naan with Dal Makhni (I honestly don’t feel there is any better combo then this one.)

You can see the making of the naan in this video below.


Ingredients:

1 cup All Purpose Flour

¼ cup whole wheat flour

¼ teaspoon baking soda

½ teaspoon sugar

Salt to taste

¼ cup Yogurt

A little less then ¼ cup water

1 tablespoon Oil

2 tablespoons Garlic chopped

1 tablespoon green chilli chopped

1 teaspoon mix of sesame seeds and onion seeds (kalonji and til)

Method:

In a mixing bowl mix; yogurt, salt, sugar, soda, whole wheat flour and all purpose flour. Mix all the dry ingredients well.

Add yogurt and start forming the dough. Start adding water little by little (you might not need to add all the water). The dough should be stretchy and soft. Cover and keep it aside for at least 30 minutes.

Heat a flat non-stick pan or skillet or tawa.

Divide the dough into 4 equal parts and roll it to ball shape of ball.

Start rolling the naan. Shape doesn’t matter; I rolled into oval cylindrical shape. Sprinkle onion seeds, sesame seeds, chopped garlic and green chilli on one side of the naan.

Place the naan with garlic side first on the tava. When you see the bubbles turn it over and cook the other side. Naan needs to be cooked on high heat. When the other side is also cooked properly; start roasting the naan on an open heat/flame on the stovetop. If you have gas burner then reduce the heat and cook the naan with the help of tong till you see brown spots. If you have induction or electric hob, then use a iron grill to roast the naan. (You must see the video above to understand what I mean).


Tips:

Rest the dough in the warm place. Do not put it in the fridge. The more you rest the better the naan will be.

For that authentic taste skip whole wheat flour and use only all purpose flour. 

Friday, July 17, 2020

Ladi Pav | Pav Recipe for Pav Bhaji, Vada Pav, Dabeli & Much More |Easy and For Beginners | The Only Pav Recipe You Will Ever Need


Today, we will discuss everything about Pav.

What is pav? Why is it called pav?

Pav is bread, just like dinner rolls or mini loaf. It was Portuguese who brought Pav to India and you used to get it in a set of four and then you break off each as you eat. The Pav means one-fourth in many Indian language. There is one crazier story that says that the bread is called pav because the dough was kneaded using feet to speed up the work. (I hope to believe the first one). Later on, when it started getting popular especially in Maharashtra, it was called as Ladi Pav.

Can you make pav at home? Does pav contain eggs?

Yes, you can make pav at home. In fact it is so easy and satisfying that you will never buy pav from the market. Majority of the places that sold pav in India contains no eggs. Almost all recipes that you will see on internet for ladi pav weather Sanjeev Kapoor, Nishamadhulika, CookingShooking –no one used eggs-so eggs are not needed to make pav.


How is pav made? Is pav made with feet? Is pav made of maida?

Pav is made with all purpose flour (maida), yeast, milk and few more basic kitchen ingredients. Pav is made in the oven but there are some recipes that use no yeast and are made in cooker or burner too. There was a rumour is earlier days that pav was made with feet to speed up the kneading process, but I don’t believe that it’s true now, thanks to all the machines. Also, with people getting health conscious, you can make pav without maida using whole wheat flour or chakki aata too but you wont get that amazing result.

Why the pav you made became hard? How to make soft pav?

When the pav comes of out the oven, it will be hard so you need to rub some butter on it, the butter gets absorbed and you are then left with soft bread. Honestly, making pav at home is simple, but you need to knead the dough well-no compromise in that. So, if you have hand beater with knead attachment or kitchen aid or stand beater then you are good to go; otherwise you need to have good hand muscles and strength to do so!!


What do with Pav? What to eat with it?

Just like, roti or chapatti or naan you can pair pav with almost anything. From making into burger to serving as it is for breakfast or evening snack. Or serve alongside any curry-pav is enough!!

Some popular pav related things are- Pav Bhaji, Sev Utsal, Missal Pav, Moong Utsal, Maska Pav or Maska Bun, Samosa Pav, Vada Pav,Anda Pav or Bhurji Pav, Dabeli, Bombay Massala Pav.

Let’s see how to make Pav.


Ingredients:

7 grams yeast (which equals to 1 sachet) I used instant yeast

2 teaspoon sugar

3 cups all purpose flour/plain flour/maida

½ teaspoon salt

1 and ¼ cup milk (warm)

4 tablespoons butter.


Check the video to see how it turned out to be.

Method:

In a large mixing bowl, activate the yeast with 2 tsp sugar and 1 cup milk. Mix and leave it for 3 minutes.

Add 3 cups of flour and salt in it and start forming the dough. You will see that the dough is tight, so add in ¼ cup milk and form the dough. The dough should be sticky.

Start kneading the dough. Punch and knock. Do this for 5-8 minutes. The more you knead the dough, the stickiness will loosen and gluten will form.

Add 2 tablespoon butter and cover the dough with a cloth or a plate and set it aside for 2 hours in a warm place. (I always leave it inside the oven).

Preheat the oven at 180 C for 10 minutes. In the meantime, grease the tray with 1 tablespoon butter.

The dough would have risen well. Knock out the air and divide into 12 equal parts. Form clean balls out of each part and start lining them on the greased tray. Cover the dough again and leave it to rise for 20 minutes. The dough should reach to the brim of the tray.

Then, bake the pav, at 180 C for 20 minutes, or until the pav turns golden brown from top.

Once the pav is out of the oven, rub the remaining butter to get a shiny look.

Let it cool down completely on a cooling rack and then serve.


Tips:

You can brush some milk on the pav right before putting it in the oven.

Some recipes I saw on internet asked for milk powder, but honestly you don’t need-the result I got was perfect without it too.

Oven timings can depend on oven to oven, so wait till the top is golden and crusty.

Tuesday, July 14, 2020

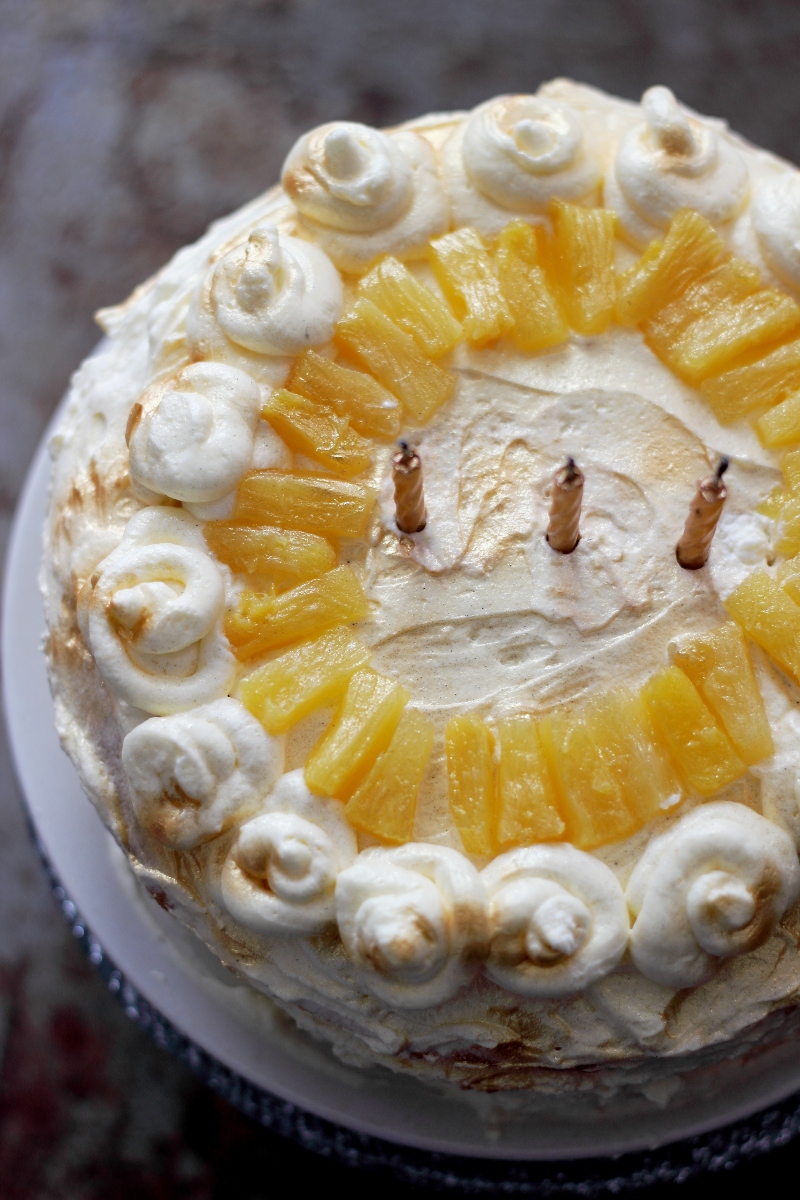
The Best Pineapple Cake | Fresh Cream Icing | Indian Bakery Style


Hey everyone, are you following me on Instagram or not? Please do so, I promise it is fun and I am much more interactive over there. Also on Instagram I share the snippets of upcoming posts and some of my previous work. So please follow me.

Okay, without wasting much time, let me come to today’s recipe. Pineapple Cake. I baked it for Mr. Husband’s birthday and oh my my, what deliciousness it was. Pineapple cake is something that most household in India don’t prepare at home, they would buy from bakeries. I would have done the same, if I was in India. I mean why not, no one can beat cakes sold in Indian bakeries. Unlike cakes in the UK, majority of the Indian bakers use fresh cream and not those overly sweet butter cream icing that we get here in London.


This is not an upside pineapple cake. This is not crushed pineapple cake. This is pineapple sponge, layered with fresh cream (whipped cream) icing and chopped pineapple. This is easy to make at home, all you need is patience and love (cliche but true ;-)

Pineapple Cake has to be soft, airy and fresh-otherwise it is not pineapple cake-simple. So, if you ask, can you make this eggfree (eggless) I would say yes you can (ofcourse) but I doubt you will get that soft supple sponge. The next thing I recommend using is canned pineapple; fresh pineapple can be sour which will ruin the whole balance of your cake. Also the leftover juice from the canned pineapple is a great element that is used to soak the sponge layers. I have shared the making of this cake HERE.


Ingredients:

For Sponge

2 and ¼ cup plain flour /maida

1 and ¼ cup sugar (I used normal white sugar)

1 cup butter + 1 tablespoon for greasing the pan

3 eggs

2 and ½ teaspoons baking powder

1 teaspoon baking soda

1 cup milk

2 teaspoons vanilla essence

¼ cup yogurt/dahi

For Icing

300 ml double cream/whipping cream

½ cup sugar

1 cup canned pineapple pieces

Around ¼ syrup drained from canned pineapple


Method:

For Cake

Preheat the oven to 170 C for 10 minutes. Grease the pan with butter really well.

In a mixing bowl, add butter and sugar. Mix till it becomes light and sugar has dissolved properly.

Now add eggs and beat again for 3 minutes.

Then add yogurt and vanilla essence. Beat again for 3 minutes. The whole mixture should turn smooth and creamy.

Sift plain flour, baking soda and baking powder into the above mixture. Mix well. Slowly start adding milk and form a smooth batter.

I used 8 inch round pan. Pour the batter in the greased pan and bake for 30 minutes or until a skewer inserted in the middle comes out clean. Carefully transfer cakes to a wire rack to cool completely.

For Icing

Start by whipping sugar and cream. Beat till cream holds the shape of the peak.

For Assembling

Once the cake has cool down completely, divide the cake into 3 layers. I use thread to do so, and it gives me great result. You can check it here.

Start assembling the cake now. So on whichever plate you want to serve, put in the first layer. Sprinkle around 2 tablespoons canned sugar syrup on it. Spread 5 tablespoons on the first layer and spread on it. Add pineapple pieces on it. Repeat the same step for second layer too.

On the final layer, sprinkle the syrup and then cover the whole cake with the whipped cream. I used the pineapple chunks on the top layer and also did some whipped cream swirls on the side.

I had some leftover glitter spray, that I used in the end for some dramatic touch.


Tips:

Make sure all the ingredients listed under the sponge list is on the room temperature.

Put the bowl, whisk attachment and cream in the fridge before you start whipping the cream.

If you can, then please use castor sugar for the sponge and icing sugar for whipped cream icing. I just used plain white one.


Wednesday, July 8, 2020

Whole Wheat (Chakki Atta/Chapati Flour) Bread


To be honest this is not the first time that I made bread at home. It’s just that in this lockdown phase I definitely went back to baking bread, probably because the whole internet world was going crazy about sourdough breads. Previously I have made garlic and mixed herbs focaccia, whole wheat olive focaccia and even red wine walnut bread at home.

The whole process of working with the yeast, punching and knocking the dough, seeing the bread rise is such a therapeutic and satisfying process that you should try it once, for sure. This whole wheat bread or loaf happened because i had yeast in the pantry and all purpose flour (maida) was nowhere to be found in the supermarkets.

I did some Google research to find a good recipe for Whole Wheat (Atta) Bread but wasn’t convinced with the recipes-some recipes called for milk powder (i had none); some recipes wanted me to use a particular kind of yeast (I had instant yeast only); some recipes were with eggs (I wanted to make eggless one) - so eventually i crafted my own recipe with little bit of this and little bit of that-Jugaad is the word I must say.


This recipe is for absolute beginners, you just can’t go wrong with it. All you need is basic roti/chaptai chakki atta (Ashirwad, Pillsbury, elephant, eastend-any brand will do), yeast, salt, butter or ghee, milk and water. This bread turned out to be crispy on the top and soft and crumbly on the inside.

Another thing about homemade bread is that, you know what’s inside. You know each and every ingredient and its quantity. You know that it’s not having preservatives, or is not loaded with sugar-and that is such a satisfying factor, I tell you! If you follow me on instagram you would know that every Friday these days, I am making bread and then using to make bruschetta, garlic bread, sandwiches and toasties. Some days I have paired it up with hummus, olives or just some cherry tomatoes.


Some of you might say that I don’t have a loaf pan to bake this bread-well worry not you can make it into round bread or even make buns –just make this bread. It’s easy, healthy, simple and so uplifting

Ingredients:

3 cups whole wheat flour/ chapatti flour

1 and ¼ cups water

1 tablespoon instant yeast

1 teaspoon salt

1 teaspoon sugar

½ teaspoon baking soda

¼ teaspoon baking powder

3 tablespoon butter/ghee/oil + a little more for greasing the pan

3 tablespoons yogurt/dahi

Method:

In a mixing bowl add wheat flour, baking soda, baking powder, yeast, salt and sugar. Mix well.

Add in yogurt and water and start kneading the dough. Punch and knock. You will feel that water is too much and dough is sticky, don’t worry-just keep kneading for 5 minutes and the dough will start coming together. Kneading helps to form gluten and that makes the bread soft.

Mix 2 tablespoons of butter and knead again for 2 minutes. Cover and let it rise and rest for 1 hour.

After 1 hour the dough must have risen double in size. Grease the pan with some oil and form the dough in the log shape and put in the greased pan. Cover and let it rise for 40 minutes.

Preheat the oven at 220 C for 8 minutes.

Bake the bread at 220 C for 25 minutes. The top part of the bread must turn crusty and golden brown. Check by inserting the knife in between, it should come out clean.

When the bread is still warm, spread the remaining 1 tablespoon butter, this will give that shine of the bread.

Let the warm bread cool down before you take it out the mould. Cut the bread and use.


Tips:

The time taken to bake varies from oven to oven. So if you see the top of the bread is getting dark but inside the bread is still raw then cover the pan with aluminium foil and then bake.

If you are not sure if the bread is done, then pat the bottom of the pan-it should sound very hollow.

Cool the bread completely before slicing.

Store the bread in container. It will stay good for around 10 days.