Tuesday, March 31, 2015

Rai Ki Mirch :Stuffed Green Chilli Pickle: Instant Hari Mirch Ka Achar: Indian Pickle


Rai Ki Mirch is a very poplar pickle in Rajasthan made with green chillies (hari mirch). No matter what the season is, this pickle is always relished. Unlike other Indian pickles this is neither time consuming nor does it need sun bathing. This is the quickest and instant green chilli pickle you will ever make. There is nothing better than homemade pickle, no preservatives and you know exactly what’s going in the recipe. If this sounds interesting to you, then, do see my instant mango pickle recipe.

I am from Rajasthan that too a marwadi and I exactly know how important this rai ki mirchi is for people of Rajasthan. There are many varieties of chillies available in the market; all I look for is fat chillies with pleasant green colour. My mom explained me; slimmer chillies have more heat in them. So when I saw these chubby chillies at the nearby Bangladeshi store, I picked it up with no other thought but turning them into pickle.


The mixture of spices with mustard oil (sarson ka tel) and lemon juice, oozes out sharp and peppery flavour which is to remembered by the tounge forever. But it is no ordinary chilli pickle; The unusual process of stuffing the chillies is the unique and exceptional characteristic. I prepare it many times in small batches and gobble it with parathas, aloo puri and pulav. Over all; no rocket science, no pain- all you need is the appetite to relish it.

Ingredients:
1 cup green chillies- washed and dry
1 tablespoon lemon juice
1 ½  tablespoon Mustard seeds/ rai
½ tablespoon fenugreek seeds/methi
2 tablespoon fennel seeds/saunf
1 teaspoon dry mango powder/amchur
Pinch asafoetida/hing
Salt to taste
1/4 cup mustard oil

Method:
  1. Slit green chillies such that it opens like a pocket. Remove the seeds and keep aside.
  2. In the grinder, grind fenugreek, fennel and mustard seeds into coarse powder.
  3. Heat oil to the smoking point and then let it cool. Now again heat the oil (only till it gets warm).
  4. Mix the warm oil with asafoetida, salt, dry mango powder and grinded coarse powder. Keep this paste aside for 1-2 minutes.
  5. Fill ¼ teaspoon of the above paste in each chilli. Do same with the remaining chillies.
  6. Finally mix in the lemon juice and toss well.
  7. The pickle is ready to eat. Store in any airtight glass or plastic container.


Notes:
It stays fresh up to 3 weeks in the fridge. (Fresh is always better)
Any type of chillies can be used, depending on the level of heat you can handle.
I grind the spices in the large quantity and keep it ready for the future use.
Any other oil can be used instead of mustard oil. (No olive oil please)

Sunday, March 29, 2015

Vegetable Cheese Grilled Sandwiches: Indian Street Style


It was 3 in the afternoon and sun was shining. I had just done the dishes and my phone rang. Are you busy, she asked? No, what is it? I replied. Well, I am near your house for some work and I have one spare hour, can I drop in at your home, she responded. Sure, I said in excitement. It was my friend and we hardly meet; she is busy with the kids and home all the time.

When two girls meet, they talk about everything- mother in law, movies, makeup, shopping, how you lost weight and ofcourse recipes. She is a big time foodie and like me she loves Indian street food. After a lot of discussion over food and cooking, we were hungry. Just a quick look in the fridge and I decided to make Vegetable Cheese Grilled Sandwiches.  I used my new favourite Warburtons Sandwich Thins and since the day was sunny we ditched tea and paired it red wine.


Sandwiches- a quick meal idea. Indian spiced massala omelette sandwich for breakfast, spicy and tangy Bombay sandwich for evening, roasted veggie sandwich for brunch or English cheese onion sandwiches for teatime or picnic. Everyone loves sandwiches; the choice only varies for stuffing. These sandwiches are for the ones who love cheese and spicy food.

Dollops of cheese with crunchy vegetables and spicy green chillies; layered neatly between the soft, cotton like white bread; Finally, grilled on a pan till crisp and golden on outside and oozing melting cheese from inside. These are real good Indian style vegetable grilled sandwiches- peppery, cheesy and honest.


Ingredients:
4 slices white bread
2 slices cheeses (I used cheddar)
1 green chilli chopped
1 tomato
1 onion
1/2 capsicum
2 tablespoon tomato ketchup
2 pinch chaat massala (recipe here)
1 tablespoon butter
1 tablespoon green chutney (recipe here)

Method:
Chop onion, tomato and capsicum into rings.
Spread tomato ketchup on two bread slices.
And spread green chutney on other two bread slices.
On two slices, put cheese slices on each. And equally spread green chillies on it.
On the remaining bread slice arrange vegetables.
Sprinkle chaat massala on all the bread slices.
Heat tava/pan on medium heat. Put 1 teaspoon of butter on the pan and roast sandwiches. When cheese starts melting, apply the remaining butter on uncooked side and turn the sandwiches. Roast till sandwiches are crisp and golden.


Notes:
You can grill these sandwiches in griller or sandwich maker too.
If you can’t find cheese slices, just use grated cheese instead.
Feel free to use cucumber and boiled potato as well.
Never make these sandwiches in advance, they will turn soggy.

Serving suggestions:
Serve ketchup, mayonnaise or Indian green chutney.
To complete the meal serve along baked potato wedges.
Pair with alcoholic drinks such as bloody mary or indian vodka mojito.

Thursday, March 26, 2015

Kesar Seviyan Kheer :Vermicelli Milk Pudding Infused With Saffron


Cooking is love made visible, food is magical. Treat a kid with cupcake and see the spark on his/her face. After a breakup or a hectic day just give a woman scoops of icecream and then see her reactions. After an argument with your partner, make for him/her favourite dish and then see anger melting down. That’s what food does-bring smile to faces, relax the mood and ease down the irritation.

Everyone has their favorite dish, the dish that you can die for. What’s your favourite dish? For me it’s Kheer, milk pudding made with rice or vermicelli. What kheer does for me is what chocolate would do for many women. In summers, on a shiny sunny day I would prefer a bowl of chilled Rice(chawal) Kheer but on cold night I would love to gulp bowls of hot Seviyan Kheer.


Kheer is made my boiling milk with rice (chawal), vermicelli (semiya), sago (sabudana) and many other grains. Basically you need to boil the milk till it gets thick and then sweeten it with sugar, jaggery (gud) or condensed milk. Flavoured with cardamom (elyachi) or saffron (keasar) and garnished with chopped nuts. This is also known as Payasam in south and Payesh in Bengal and is generally made during festivals or special events.


Unlike other Indian sweets such as Gulab Jamuns or Suji Ka Halva this sweet dish is prepared quickly and is the easiest one. Here is how to make Kesar Seviyan Kheer, my way.

Ingredients:
1 cup broken vermicelli/seviyan
1 liter milk
5 tablespoons sugar
1 tablespoon ghee/unsalted butter
4-5 green cardamom pods/elaychi
1 teaspoon saffron/kesar
5 tablespoon nuts to garnish (notes)

Method:
  1. Heat ghee in a pan and on slow heat roast the vermicelli to golden borwn.
  2. Open cardamom pods and add to vermicelli and let it release the aroma.
  3. In a heavy bottom kadai/wok boil the milk. When milk comes to boil, add pinch of saffron.
  4. Add sugar and vermicelli. Let it cook for 10 minutes on slow flame. Let it boil till vermicelli is cooked.
  5. If you like thick kheer cook for another 5 minutes. I like to have bit runny kheer, so I did not cook more.
  6. Garnish with chopped nuts and remaining saffron.
  7. Serve warm or cold


Notes:
I used almonds, cashews and raisins, feel free to use any nuts. If you want you can roast the nuts in ghee too.
Please use good quality full fat milk for this recipe.
I like sweet kheer, but adjust sweetness as per your taste.
Saffron gives subtle aroma and nice yellowish-orange colour to the kheer. I used this saffron
For  thicker kheer, use more vermicelli.

Sunday, March 22, 2015

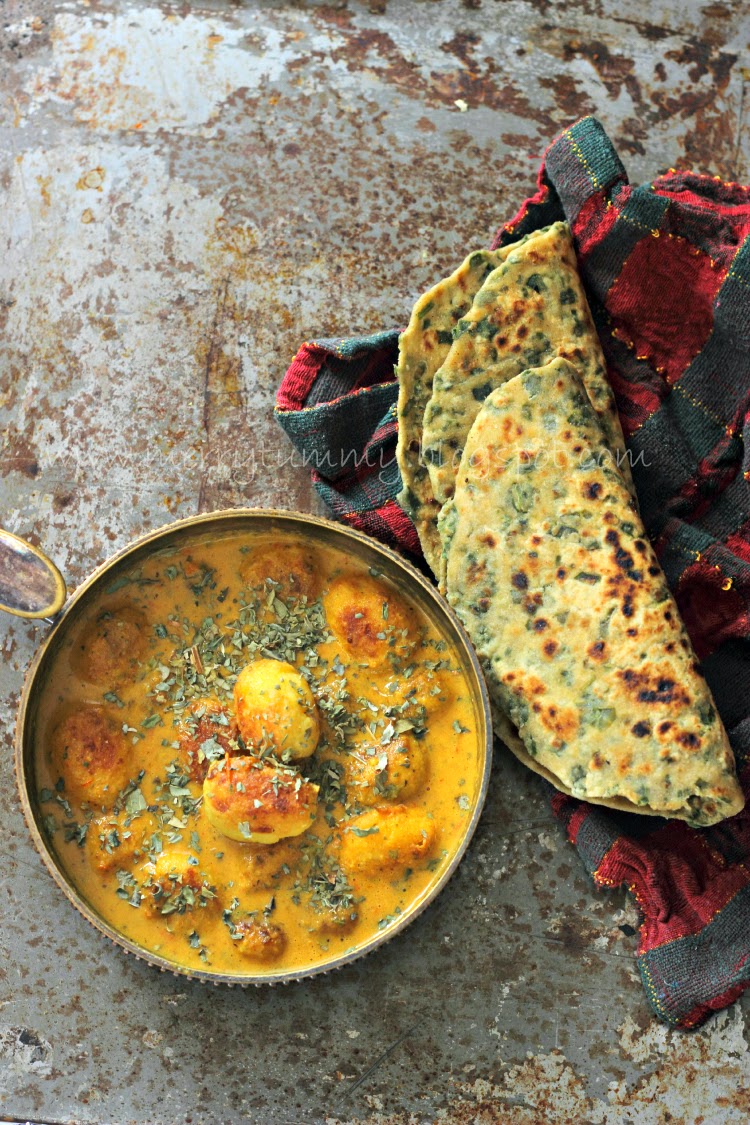
Punjabi Dum Aloo: Baby Potatoes In Rich Tomato Gravy


A non Indian friend who follows my blog and loves my cooking always asks-don’t you get bored of Indian cooking, rolling rotis and making curries every day? Ah! No, I don’t. Indian cooking is therapeutic and rejuvenating. Every massala is important, every spice is significant and every step is pure bliss. Cooking Indian food is a magical process, a satisfying experience and an art. You can’t throw or mix anything at anytime; you need to wait for the oil to get hot, for cumin to splutter and for aroma to rise. Oh, only an Indian can understand my words.

Rich curries like paneer butter massala, paneer kofta, daal makhani happens once a month because such recipes are royal in terms of process and ingredients.  There are simple Indian curries which are everyday affair such as gajar mutter, palak bhaji or gobi mutter –straightforward and uncomplicated. So when I have time and good mood, I like to indulge myself into royal cooking experience else I stick to simple Indian cooking-but, no, I never get bored and I never will :-)


Moving on, we have subscribed to Netflix and now we hardly move out of the house. We finished watching breaking bad series (all seasons) in 15 days-yeah we are hooked to our television set. Saturday we had no other plans either, we are now binge watching Homeland. Mr. Husband wanted to eat something nice, I know his ‘nice’.-meaning a subji that has aloo (potatoes). How about sukha aloo (dry potatoes) I asked. No, he said, something spicy that would go with this wintery climate. Dum Aloo, I whispered. He nodded yes with excitement. Dum Aloo is another example of how amazing and creative Indian cooking can be.

Dum Aloo (baby potatoes in gravy) ,takes on different flavours as it travels from state to state throughout the India. Kashmiri Dum Alu is made using yogurt (dahi) and cashews and is sweet in taste. In Bengal, it is known as 'Aloor Dom' and is said to be lightly spiced and simple. Laknawi (Lucknow) style dum aloo has center filled with paneer and later dunked into caramelized onion gravy. Today I am sharing Punjabi Dum Aloo.

In Punjab, its more like restaurant's, with a thick and tangy gravy with tomatoes and yogurt and delicately spiced. This has balance of all the taste buds- sweet, spicy and bit tangy. Lots of whole spices are used to release subtle aroma. We both love and relish Punjabi style of Dum Aloo the most. Don’t stop or hesitate to cook this after seeing the number of steps, like I said, Indian cooking is the best-do try this.


Ingredients:
Baby potatoes-10
1/4 tsp asafoetida /hing
1 medium sized onion roughly chopped
2 medium sized tomatoes roughly chopped
1 teaspoon ginger/adrak chopped
4 cloves garlic/lehsun chopped
1 cup of curd/yogurt
1/4 teaspoon turmeric powder/haldi
1 teaspoon red chilli powder/lal mirch
1 tablespoon dried fenugreek leaves/Kasturi methi
1 bay leaf/tej patta
Oil for cooking and shallow frying
1 tablespoon butter or ghee
1/4 teaspoon sugar
Salt to taste
1 teaspoon corn flour
4 tablespoon coriander leaves finely chopped for garnishing
(For Massala/Spice mix)
1 Black cardamom/badi elyachi
2 green cardamoms/hari elaychi
5  peppercorns/kali micrh
1 tablespoon coriander seeds/dhaniya
1/2 teaspoon fennel/saunf
1/2 inch cinnamon stick/dal chini
3 cloves/laung
2 dry red chillies

Method:
  1. Dry roast all the ingredients listed under spice mix list on slow heat. Once cooled, grind them to fine powder.
  2. Wash potatoes. In a pressure cooker put sufficient water (just to cover potatoes) with 1 teaspoon salt. Cook on high flame till 2 whistles are released. Peel the potatoes.
  3. Take a fork and start pricking every potato with it (make holes). Heat 4 tablespoon oil in a pan and shallow fry potatoes till golden and crip from all the sides.
  4. Heat oil in a wok/kadai. When hot, add in asafoetida and bay leaf.
  5. Add garlic, ginger. Mix for 1 minute.
  6. Slow down the heat. Add chopped onions and cook till onions turn dark pink in colour.
  7. Add chopped tomato. Mix in salt, corn flour, red chilli powder, turmeric powder and 1 teaspoon fenugreek leaves. Cover and cook till tomatoes are soft and mushy.
  8. Mix the dry roasted spice mix with yogurt and beat till smooth. Pour this paste in tomato paste and keep stirring for 2 minutes. When you start seeing oil on the edges, turn the heat to low and cook it covered for 5 minutes.
  9. Blend the above made gravy in the blender with 1 cup of water. Sieve this gravy (chaan le).
  10. Heat ghee/butter in a pan and add gravy to it. Throw in potatoes and sugar, cover and let it simmer on slow heat for 10 minutes.
  11. Garnish with coriander leaves and dried fenugreek leaves.


Notes:
This can be made all yogurt or all tomato gravy as well. Only the colour will change.
For low fat (healthy) version don’t shallow fry the potatoes, just use the boiled one.
Every pressure cooker is different, so make your own judgement while boiling potatoes.
Dry roasting and grinding the spices can be done 1 week before.
Consistency of gravy is smooth and thick, but, feel free to adjust water as per your choice.

Serving Suggestions:
Serve with naan, roti or any plain paratha. I served with methi theplas.
Goes well with rice or biryani.
It is a royal dish, so do make this to please your guests for parties of get together.
For the complete Punjabi thali serve it with paneer butter massala and dal makhani.

Friday, March 20, 2015

Zucchini Kofta Curry: Taroi (Galka) Ke Kofte Ki Subji


And there you have another kofta recipe. This is more like a requested recipe. A week back a reader emailed me asking for an interesting and yet healthy zucchini recipe. In Hindi zucchini is called as taroi, tori, turai or galka. In India people think it is boring and a very pale vegetable. Only when I moved to London I realized that is a very versatile ingredient, people have used it in cakes, pasta dishes, sushi rolls and what not.

I wanted to produce a recipe that is Indian and ofcourse healthy too. Dont you think zucchini is like bottle gourd (luaki) in taste and texture? I do, and that's why just like Lauki Kofta Curry, I made koftas out of zucchini too. For a healthy twist, all you need is paniyaram pan and little extra time. I said little extra time because these koftas are made on a very slow flame and that what helps to give the perfect texture. You need to cover the pan and keep an eye so that it cooks evenly from all the sides and there you will have crisp on outside and soft from inside koftas- don’t forget zero oil :)

Trust me Zucchini Kofta Curry/Subji will be your favorite. Dunk these koftas in tomato gravy or yogurt gravy and enjoy its hot scoops with moong daal parathas or methi theplas.


Ingredients:
(For Kofta)
1 large zucchini/taroi
2 tablespoons chickpeas flour/besan
Salt to taste
1/4 teaspoon fennel seeds/saunf
1 green chilli
1 garlic clove/lehsun
1 teaspoon coriander leaves/dhaniya

(For Gravy)
3 medium tomatoes
2 onions/pyaz
1/2 inch ginger/adrak
5 cloves garlic/lehsun
1 green chilli
2 tablespoon yogurt
2 tablespoon oil
Pinch asafoetida/hing
1 teaspoon cumin seed /jeera
1 tablespoon gram flour/basen
1 tablespoon coriander powder/dhania
1/2 teaspoon turmeric /haldi
1/2 teaspoon salt -adjust to taste
1/4 teaspoon red pepper powder/lal mirch
2 tablespoon finally chopped coriander/hara dhania
1 teaspoon sugar

Method:
(For Kofta)
Peel the skin of zucchini and grate it finely. Add 2 pinches of salt in it and leave it for 2 minutes.
Chop green chilli, garlic and coriander leaves finely.
Squeeze out water from grated zucchini. Apply pressure with your palms and squeeze as much water as possible.
In a mixing bowl add everything together and make soft dough.
Heat paniyaram pan on a high heat, when it gets hot turn the flame to low. Make balls from the dough and put into each whole (cavity) of the pan. Cover and cook when it turns golden brown in colour.
Keep turning the koftas and cook till all the sides are crisp.

(For Gravy)
Blend the tomatoes, green chillies, garlic, onions and ginger to make a puree.
Heat the oil in a saucepan on medium-high. Add the asafoetida, cumin seeds and gram flour. Stir for minutes.
Add the tomato puree, coriander powder, turmeric, and cook on medium heat until the tomato mixture starts leaving the oil and reduces to about half in quantity.
Next add yogurt and cook for another minute.
Add about 1 cup of water and the salt. As it comes to boil reduce the heat to medium-low and let the gravy cook for few minutes.
Add the prepared koftas and let it simmer for another 7 to 8 minutes.
Turn of the heat and add the coriander and cover the pot.


Notes:
Once you mix everything together, don’t delay in making the koftas because the salt will make the dough watery.
These are absolutely no oil koftas, however you can add little oil in each whole of the paniyaram pan for more crispy koftas.
Paniyaram pans are easily available and I use the non stick one. You can buy one from here as well.

Serving suggestions:
Serve them with any Indian bread-roti, parathas or naan.
Serve along with rice or pulav.
For the complete Punjabi thali serve it with paneer butter massala, aloo chole and dal makhani.

More Kofta Curry:

Wednesday, March 18, 2015

The Healthiest Granola Ever: No Sugar: No Butter: No Apple Sauce


Having a healthy breakfast is a necessity for us. All unhealthy breakfast like Aloo Parathas or Aloo Puri we keep for our cheat days which is once a month. For other days we stick to healthy options like Bombay Kanda Poha, ­­­­Masala Veggies OmeletteSprouts Dosa -Indian items. But there are days infact weeks when I have no time in hands and that’s when I look for muesli, granola or cornflakes. I mean what can be quicker then these cereals, right?? Just mix in fruits, yogurt or milk and there you have a healthy and filling breakfast ready.


I did try many brands of granola but I never checked the label, the calories, the sugar that goes in the so called ‘low fat’ granola packs. 2 months back I started repenting my mistake and begin making my own homemade granola. This is the best and the healthiest granola/muesli recipe ever. It is no sugar, no apple sauce, no butter and no candied dry fruits granola recipe. It consists of rolled oats, lots of nuts, raw honey, coconut oil and my favorite flax meal.

Flax meal is so important and every one must have it in some form, for ideas see my post on How to include flax seeds in your diet. I used sunflower seeds, pumpkin seeds and cashews, but feel free to use any nuts that you like. Anyone who loves to eat healthy, this recipe is a keeper-period. Forget market ones and make your own healthy granola, so as to have guilt free breakfast or evening snack.


Ingredients:
1 cup rolled oats
1/4 cup pumpkin seeds
1/4 cup sunflower seeds
1/4 cup cashews
2 tablespoon flax seeds powder
2 tablespoon raw honey
1 tablespoon coconut oil

Method:
Preheat the oven 175C
In a large mixing bowl add oats, flax seeds powder, pumpkin seeds, sunflower seeds and cashews. Mix everything together.
Heat raw honey and coconut oil in microwave for 10 seconds. Mix them in the granola and nuts mix.
Toss everything together well.
Line a sheet with baking/parchment or grease proof paper. Grease with little oil if needed.
Spread a very thin layer of the granola on it. Bake for 15 minutes. After 15 minutes give granola a mix and spread again. Bake for 12 minutes or till granola turns golden brown.
Let the granola cool down completely. Store in Ziploc or airtight container.


Notes:
I used this raw honey. If you want you can replace it with any honey.
Good quality coconut oil is what you are looking for, I used this one. Feel free to use butter instead.
As said above, use any nuts or seeds of your choice.
You can also use dried berries or fruits.
Stays well in airtight container for 3 weeks.

Serving suggestions:
I love with cold milk and lots of fruits.
Can be served with yogurt-both plain and flavored.
For a heavier snack serve with sweetened whipped cream.
For some crunch top it on cake or pudding.

Tuesday, March 17, 2015

Gajar Mutter, Carrot Peas Stiry fry: Indian Side Dish


Think positive, he said. When I sulk over pity issues, there is always a voice telling me to think positive and be positive. The thing is I love fresh fruits and vegetables, the seasonal produced  ones and when I have to eat orange carrots and frozen peas it kind of freaks me out. I have grown up eating and enjoying red juicy carrots or pealing bright green peas and after 3 years I miss these seasonal veggies. Last weekend I almost (well almost) cried for red carrots and fresh peas, because everyone in India enjoyed them throughout the winter while I don’t even get to see them in the market.

Think positive, a voice whispered. While people in India can eat carrots or peas only in winters, I must be thankful to be able to consume it for the whole year. Toh kya hua if I get orange carrots or frozen peas, I atleast get them :-) Lesson learnt, be grateful and appreciative.  With a broad smile on my face I decided to make very simple and yet very popular Gajar Mutter, Carrot Peas Stiry fry.


Nothing beats simple cooking, there you find immense satisfaction. Simple in terms of methods but high in flavours. Sweet carrots and peas are cooked with basic Indian spices on low heat-the result a definite everyday kind of meal. Serve this along with tadka daal, rice and roti.

Ingredients:
2 large carrots/gajar, pealed and chopped
1/2 cup peas/mutter
1 tablespoon oil
1/2 teaspoon cumin seeds/jeera
1/2 teaspoon red chilli powder
1/4 teaspoon turmeric/haldi
1 teaspoon coriander powder/dhaniya
Salt to taste
1/4 teaspoon dry mango powder
1 tablespoon coriander leaves

Method:
Heat oil in a pan. When oil gets hot add cumin seeds.
Add chopped carrots and peas. Turn the heat to low.
Add salt and turmeric. Mix. Cook covered for 10 minutes.
When carrots and peas are half cooked, add coriander powder and red chilli powder. Cover and cook again till carrots and peas turn soft.
Finally mix in dry mango powder and chopped coriander leaves. Serve hot.


Notes:
I used frozen peas, feel free to use fresh peas.
Boil peas first to shorten the length/time of cooking.
You can substitute lemon juice instead of dry mango powder.

Serving suggestion:
Serve with methi theplas, moong dal parathas or plain roti.
Great as tiffin/lunch box snack. Roll up in parthas.
Can be used a stuffing for sandwiches.
For a simple thali menu, serve with lehsuni daal and roti.

Monday, March 16, 2015

Moong Ki Daal Ka Paratha :Split Yellow Gram Indian Flat Bread: Healthy Paratha Recipe


Moong ki daal ka paratha (yellow mung beans/split yellow gram lentil Indian flat bread) is so special to my heart. With it goes tons of childhood memories-ah those days! Even today whenever I cook these parathas, a walk through memory lane happens. Stuffed parathas such as aloo (potatoes) parathas, mutter (green peas) parathas or pyaz (onion) parathas were more likely to happen on a Sunday morning. While, moong ki daal ke parathe were happily welcomed for dinner; served along with any dry subji (Indian side dish) like gajar methi mutter, marwadi aloo pyaz, punjabi gobi mutter or bhindi do pyaza. Sometimes even simple pickle was acceptable.

You need to be simple here, simple things are tastier and the experience is satisfying. These parathas are more like theplas-thin and soft. Green chillies, ginger and coriander leaves are mixed with flour and moong daal to form dough. Later the parathas are cooked on tava/pan with oil; and then you have soft parathas with tiny bits of crunchy daal.


Moong daal as we know is a rich source of protein and when you are bored cooking normal daal or subji with it, these parathas is a good change. No boiling, pressure cooking the daal, just mix everything together and you are good to go. I have couple of friends who finds this as a great way to include lentils in their kids’ diets. Roll it up with subji, chutney, jams or pickles. Pack them for their schools, take them on summer picnics, train journeys etc.


Ingredients:
2 1/2 cups +for dusting, whole wheat flour
1/2 cup yellow moong daal
2 chopped green chillies
2 tablespoon grated ginger
4 tablespoon chopped coriander leaves
1 teaspoon fennel seeds/saunf
1 teaspoon coriander seeds/dhaniya
1/4 teaspoon turmeric/haldi
Pinch asafoetida/hing
1 tablespoon lemon juice
Salt to taste
1 tablespoon oil+ for roasting parathas

Method:
Wash and soak moong daal for 30 minutes. Drain the water.
Coarsely grind coriander seeds and fennel seeds.
In a mixing bowl, mix flour, salt, fennel seeds, coriander seeds, turmeric and asafoetida.
In it add washed moong daal, lemon juice, ginger, coriander leaves, green chillies and 1 tablespoon oil. Start kneading the dough. Add water only if needed. The dough should be medium soft. Set aside for 15 minutes.
Heat the pan/tawa. Start making the parathas. Divide dough into 10 equal parts and give them a round shape. Take 1/2 cup dry wheat flour in a plate for dusting. Take one dough ball, flatten it like pattie and dust dry wheat flour over it. Roll out the paratha.
Place it on a hot tava/griddle and cook over medium flame. When tiny bubbles starts to rise on the surface, flip it and reduce the flame to low.
Spread 1/4 teaspoon oil around edges and spread over the paratha. Flip it again and spread 1/4 tsp oil around over it. Press it with spatula and let it cook over medium flame. Cook until golden brown spots appear on both sides. Follow the same process for remaining dough balls.


Notes:
For more healthy option, you can omit the use oil, simply use a napkin to roast the paratha.
I like it spicy please adjust the amount of green chilly as per your taste.
Increase the amount of oil if you want to take them on long train journeys.

Serving suggestions:
Serve hot with chutneyraita or pickle of your choice.
Goes well with any side dish or curry.
These are perfect to be served at breakfast, brunch and as evening or picnic snack.

More healthy parathas: