Tuesday, June 30, 2015

Red Kidney Beans Hummus: Beans Hummus: Summer Dip: 5 Minute Hummus


Good news! Summer is here and let’s pretend it’s going to be this nice for the whole year. Bring on some chilled cocktails, cold pasta salads and sandwiches. Are you gearing up for a beach bath, or having a BBQ in the park? Spending some me-time with a book or just watching a movie at home? Whatever it is, you guys have to bring in some colours, some happiness in form of Corkers. When the postman delivered this huge box of crisps at my door steps, the colours just brightened up my mood. Pink, purple, orange, blue, green all packed with crunchy crisps and flavours. 

What makes Corkers crisps so special is the fact they are made from delicious Naturalo potatoes, grown in the black, peaty fenland soil of Cambridgeshire, which give the crisps a unique crunch and makes them perfect for frying.  Not only are the potatoes grown on the family farm but it’s also here that they are hand-cooked to perfection.


You can pick your packet from seven bold British flavours, each featuring top quality, all-natural ingredients and cooked in fresh sunflower oil:
  • Pork Sausage and English Mustard – Expect the delicious flavours of barbecued British bangers finished with a hint of Old English Mustard
  • Red Leicester and Caramelised Onion – A winning combination of slow roasted onion and rich creamy red Leicester cheese
  • Sea Salt and Cider Vinegar – Made using the finest English cider which is sweet in taste with a hint of zest, these crisps will make your mouth water with every crunch
  • Sea Salt and Black Pepper – Sure to warm your pallet, these Gold Taste Award winning crisps are made from sweet and hot peppers
  • Duck and Hoisin Sauce - A partnership of two British greats, both the duck and the Naturalo potato, hail from the Corkers family farm.


I opened the packet of my favourite Sweet Thai Chilli crisps and the aroma was too tempting. Spiked with sweet chilli and herds; perfect crunch-you would only want more and more. Sea Salt flavour chips are simple and yet so elegant. Indeed it has won them great taste golden award. Fried to perfection, seasoned just right and the crunch is bang on. What else you would want in a crisp? Why not crush these crisps and add some crunch on your boring salads or pastas. Or escort them as a side with burgers, patties or any snack. Dive right in; Corkers Crisps are great for picnics, barbecues, potlucks, parties, and more! I am yet to try all the packets, but you can click here to check all delicious flavours.

Dips that would go with these crisps are:

Or like me, add Mediterranean flair to your summer menu. Pair with it hummus. Not chickpeas hummus (so yesterday!) but Red Kidney Beans Hummus: a.k.a rajma. A deep earthy flavoured hummus. Burnt garlic, green chillies, coriander leaves, ton of olive oil and lime juice- all blended into a velvety creamy dip. This will get ready in 5 minutes if you are using canned beans. Loaded with goodness of proteins, healthy fats and vitamin C. Pop open a beer or a drink, bag of crisp, this dip and enjoy summers.


Ingredients:
1 can or 400 grams Red Kidney Beans/Rajma
2 cloves garlic
1 green chilli
5 tablespoons coriander leaves chopped
2 tablespoons lemon juice
Salt to taste
4 tablespoons olive oil
2 tablespoons water


Method:
Wash and drain the red kidney beans. Strain and keep aside.
Roast garlic on open fire. Peel the skin and keep aside.
In a food processor or grinder, grind everything together till you get creamy dip.
Serve.


Notes:
If using raw beans, soak it overnight in water. Next day drain the water and boil in the open pan or pressure cooker till it becomes soft.
You can use cumin powder as well (jeera powder) in the recipe.
Coriander leaves can be substituted with parsley leaves.
You have to use a good quality olive oil for a nice texture. I recommend Colavita Extra Virgin Olive Oil.

Serving suggestions:
Serve with cucumber or carrot sticks.
Pair with bread, crackers, nachos or chips.
Use as a spread for sandwiches or pita pockets.

Disclaimer: I was not paid or told to write positive review. The post is based on my experience and is unbiased. Thanking Corkers Crisps and SpringPr for sending crisps for review.

Monday, June 29, 2015

Jeera Rice: Basmati Rice With Cumin Seeds: Indian Rice


Some one the other day asked me for the recipe of Jeera Rice and I was so shocked to know that the recipe is not on my blog. I mean you aren’t an Indian food blogger if you don't have jeera rice recipe on your blog. No seriously, I was so ashamed. Jeera Rice is like run in the mill in most of the Indian homes. Anyways, that day itself I made jeera rice clicked the pics and here I am posting it without any further delay.

Jeera as we call in Hindi is cumin seeds and is THE most important ingredient in Indian Punjabi cooking. Personally I cant do without this spice, be it paneer currieskofta curries or homemade spice mix like chaat massala or garam massala. The ancient Ayurveda and age old wisdom of grandmothers insist on having cumin seeds because of its medicinal values.


Common benefits of cumin seeds are:
Improves digestion
Increases concentration
Reduces cholesterol
Weight loss
Relieve stress
Deceases bloating and gas
Detoxifies liver
Reduces menstrual cramps
Increases lactation in new mothers


Coming back to the post, Jeera Rice is basmati rice (chawal) which is flavored with cumin seeds. Cumin seeds are roasted in ghee or butter to release the aroma, later cooked rice is mixed in it. Now here is one modification that take place, some use cooked rice (boiled rice) while some cook the rice with cumin like how you would do for biryani or pulav. No method is right or wrong, you do what you prefer. Things that remains the same is ghee (clarified butter), some cloves (laung), bay leaf (tej patta) and lots of cumin seeds.


Use a good quality long grain basmati rice for best results. You can read a complete post on how to cook rice perfectly for moretips and clear idea. I always cook rice in microwave to save time and then just pour the cumin seeds tempering on the rice, mix and cover it for 1 minute so that flavoures remain intact. This is the Plain Jeera Rice recipe, which is more like day-to day rice; to give it more elegant restaurant feel then you must add cashews and raisins (kaju and kismis).

What to pair with jeera rice? Check these out:

In simple words, jeera rice is a step further both in looks and taste from the regular plain boiled white rice. The little golden coloured cumin seeds mixed with pure white boiled rice gives a uplifting colour combination. 


Author: Shweta Agrawal
Cuisine: Indian: Punjabi: Bangladeshi: Pakistani
Serves:2-3


Ingredients:
1 and 1/2 cups basmati rice
1 teaspoon lemon juice
2 teaspoon cumin/jeera
1 bay leaf/tej patta
2-3 cloves/laung
3 cups water
2 tablespoon butter/ghee
Salt to taste

Method:
Wash basmati rice two three times. Soak the basmati rice in water for 30-40 minutes. Drain the rice and keep aside.
Put rice in microwave safe bowl. Add 3 cups of water, lemon juice and salt. Cook on high power for 12 minutes. Cover the bowl with plate and cook again for 8 minutes.
Heat a pan. Add ghee or butter. Reduce the heat to low.
Add in cloves, bay leaf and cumin seeds. Let cumin seeds turn golden. Heat a pan.
Add cooked rice and stir with softly. Make sure not to apply lot of pressure else rice will become mushy.
Let it sit covered. Fluff the rice and serve jeera rice hot.


Notes:
You can also use cardamom (elyachi) or cinnamon (dal chini) in the recipe. However I don’t like sweet aroma in rice so I avoid it.
You can use vegetable oil or sunflower instead of ghee or butter.
Lemon juice helps to separate the rice grains and gives nice white colour.
Use good quality long grain basmati rice. I recommend Tilda Basmati Rice.

Serving suggestion:
Serve as side with any indian curries.
Serve with lentils and dry curries.
Mix with salad, chutneys and stuff in tacos or burritos.


Thursday, June 25, 2015

Whole Wheat Focaccia: Black Olive and Garlic Focaccia Bread: Italian Bread


Life without bread would be so boring. How would you eat your pasta with no garlic bread on side? How would you make sandwiches? What would you serve soups with? All you need is bread to complete your meal.

Lately I have been in the baking sphere. I made Garlic Rolls a few days back and then Herbs Garlic Focaccia two weeks later. Focaccia is one such bread that every novice and beginner baker must try. No bread making can get simpler than this. It is rustic, it is soft and it can be paired with anything-dips, chutneys, lasagna, and pasta or just as it is.


Olive oil is a must when making focaccia and NO there is no substitute for olive oil. A good aromatic olive oil will bring out the best focaccia bread.  Focaccia is an Italian bread and there are hundreds variations for the recipe but the basic bread or dough recipe remains the same. You can change the toppings as per your taste and mood ;-). You can have tomatoes, garlic, olive oil, caramelized onions, nuts and even fruits as toppings.


For a healthier twist I crafted Whole Wheat Focaccia Bread with Garlic and Olives. Garlic, olives, some herbs all sitting on the top of rustic bread is something so enticing and inviting; plus is it guilt free-bonus! If you want to learn and know more about yeast and its process click here. Once you master the art of yeast then baking bread is very easy peasy.
Whole Wheat Garlic Olive Focaccia can be served with basically anything. My favourite way is to dip it in with some olive oil. If you fancy a focaccia sandwich, slit the bread in between and stuff in pesto sauce and some vegetables-grill and enjoy.


Author: Shweta Agrawal
Cuisine: Italian
Serves: 4-5

Ingredients:
1 and 1/2 cup whole wheat flour
1 teaspoon rapid dry yeast
2 pinch sugar
1/2 cup water
1/2 cup olive oil
1/2 teaspoon salt
1/2 teaspoon black pepper
1 tablespoon mixed dry herbs
4 cloves garlic roughly chopped
5 olives roughly chopped
1/4 teaspoon coarse sea salt (optional but recommended)

  1. Method:
  2. Heat water in microwave for 20 seconds. Dip the finger and check water, it should we warm. Mix sugar and yeast in water. Stir and keep aside for 10 minutes.
  3. After 10 minutes when you see bubbles on yeast mixture, add flour, salt and 1/2 teaspoon mixed herbs. Mix and knead the dough.
  4. Mix 1/4 cup of oil in the dough. Keep kneading the dough till it is soft and springy.
  5. Grease one large bowl with 1 tablespoon oil. Put the dough in the bowl. Cover it with cling film and keep aside in warm surface for 45 minutes.
  6. After 45 minutes the dough should have risen, beat the air out and knead the dough again. Flatten the dough on a grease pan in to any shape (I shaped in round in pizza pan). The thickness should be like a normal crust of pizza. Cover the dough with wet towel and keep in a warm place for 20 minutes.
  7. After 20 minutes, poke holes (dimples) on the dough. Cover and keep aside for 10 minutes. Till then preheat your oven at 190C.
  8. Arrange chopped garlic and olives on focaccia evenly.
  9. Prepare the oil. Mix black pepper and remaining dry herbs. Keep aside.
  10. Pour this oil mixture on dimples of the dough. Spread the oil mixture evenly without punching the air. Sprinkle the sea salt.
  11. Bake for 15-18 minutes. The bread should be golden brown on top.
  12. Let the bread cool down before you cut and serve.


Notes:
You can make it even without garlic. Or use whole olives. I used canned black olives.
Keep your dough in a warm place. I always keep it in the oven. A friend of mine who lives in the hills covers the bowl with a blanket and keep it dark place-for her this trick works.
You have to use a good quality olive oil for a nice texture. I recommend Colavita Extra Virgin Olive Oil.
Use active rapid dry yeast or also called as instant yeast. I used Allinson Easy Bake Yeast.
Mixed Italian herbs are easily available in any store. It is blend of oregano, thyme, rosemary and basil. I used McCormick Italian SeasoningYou can use any particular herb as well. Rosemary is the most popular one.
Cover the bread with cling film and store it a room temperature. It will be good for 2-3 days.

Serving suggestions:

Tuesday, June 23, 2015

Dum Aloo Recipes: 7 Dum Aloo Styles


Dum aloo , baby pototes cooked with spices. Dum Aloo (baby potatoes in gravy) ,takes on different flavours as it travels from state to state throughout the India. Todays post is collection of different dum aloo recipes.

Punjabi Dum Aloo:
Royal north Indian style dum aloo cooked with spices and dipped in tomato gravy. Get the recipe here.
merry tummy


Kashmiri Dum Aloo:
Gets it name from kashmir, northern most part of inida. In it goes kashmiri red chillies which is not at all spicy but gives dark red colour to the curry. Get the recipe here.
cook with manali


Benagli Dum Aloo:
Also known as Aloor Dum is richly spiced. The most important ingredient is mustard oil. Get the recipe here.
veg recipes of india

South Indian Style:
Also known as potato roast. Very dry curry with simple south indian spices. Get the recipe here.
Lincy cook art


Lucknowi Dum Aloo:
Baby potatoes are scooped and then stuffed with paneer. This is mildly sweet version. Get the recipe here.
sowmyas kitchen


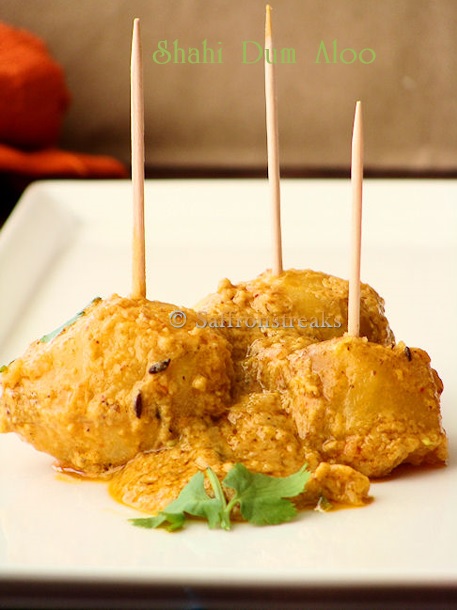
Shahi Dum Aloo:
Which literally translates to Royal Dum Aloo. Royal because in it goes many whole spices and is then coated in cashews gravy. Get the recipe here.
saffron streaks


Niramish Dum Aloo:
Simplest style, no onion, no garlic and no tomato. Get the recipe here.
ecurry

So next time when you have baby potatoes, do try these Dum Aloo recipes.

Monday, June 22, 2015

Beetroot Lassi: Chukander Ki Lassi: Beet Smoothie: Summer Cooler


So, here I made another summer cooler.

Oh it is pink.

Refreshing and beautiful.

I made us Beetroot Lassi.

Roasted Beetroot Lassi.

You must know by now that I am addicted to roasting fruits and veggies. This is the best thing one can do in the kitchen. When you roast a fruit or a vegetable, it brings out its natural sweetness which gives a dish a fresh dimension.

And BTW this below pic is my first attempt on capturing steam :) Do you like it? Please comment :)


Check out more roasted summer recipes:


So what is lassi? In simple words it is a smoothie made with yogurt/curd (dahi) as a base. To it you can add fruits or make it plain with just sugar and water. I have prepared low fat (sugar free) strawberry lassi before and the world famous mango lassi too. But this is the first time I ever experimented with vegetable lassi and I am so glad that it happened. Lassi which is made with beetroot, ah! I mean look at the colour, isn’t it gorgeous and summery?


You can use plain beet as well, however I truly recommend to burn or smoke beetroot, it will bring a pleasant taste and you will be hooked- I bet! You can simply roast the beet directly on the hob, or you can grill in the oven at 200C for 10 minutes. Hob method is quick and easy-so you decide :)


After that you need to do is just blend in milk, yogurt, beetroot, sugar and water for few seconds and the lassi is ready. Oh yeah, I added rose water for aroma, you can add cardamom (elyachi) too. So yup that’s it. Serve it with or without ice cubes, but serve it chilled. It is summer after all. Bring on some sipping :)

Ingredients:
1 small beetroot/chukandar
1 cup yogurt/dahi
2 tablespoons sugar
2 tablespoons milk
4-5 ice cubes
1 teaspoon rose water

Method:
Peal the beetroot. Wash and roast it on fire till you see burnt spots on the skin. Let it cool.
In the blender blend everything together for 30 seconds.
Sieve the blended lassi through a fine sieve. This step is optional, but it gives nice smooth texture to lassi.
Serve chilled.


Notes: If using oven, cover the beetroot with foil. Grill at 200C for 10 minutes.
You might need to add more sugar depending on sourness of yogurt.
For thinner lassi, use 1/2 cup milk and 1/2 cup yogurt.
You can use low, skimmed or full fat yogurt.

Serving suggestions:
For a party, serve in fancy wine glasses. Garnish with rose petals or chopped nuts.
It is filling too, you can give it your kids as an evening snack, or have it as post-workout or gym snack.


Friday, June 19, 2015

Panchmel Daal: Panchpuran Dal: Panchtatra Daal: Rajasthani Marwadi Dal: For Bati


There is always one man who will never hurt a woman and that is her dad, her father, her papa. A daughters first love is her father and I truly stand by this. I love my dad, he is my lifeline, I don't know what would I do without him. Even though we speak daily, I miss having morning tea with him, discussing about horoscopes in the newspaper. Telling him this that, having lunch together and then seeing him again for dinner. I don't need any special day to thank him, but since its father’s day, I decided to dedicate this post to him. 

Check out last year fathers day post- Kache/ Raw/ Green Tomato Chutney :)

My father is the one who holds me when I cry, scolds me when I am wrong, shines with pride when I succeed and have faith in me when I fall. He was a strict dad while we (me and brother) were growing up and we were really sacred of doing or telling something stupid in front of him. He never scolded us for bad results in exams or failing but he had his own rules like speak to everyone politely, don’t watch senseless Indian soaps (we were allowed to see KBC), don’t go outside home after 8 pm alone. He is the one who believes in society, social norms, god, and religion but is still cool. This I guess it is mostly the behavior of an Indian dad :)


Back then if my dad came to know that I take alcohol he would have been very angry and disappointed but now he is like a friend to me. I don’t hide things from him; I just know he will understand. Last year on my trip to India I had shared the drink with the three most important guys in my life-papa, bro and my husband; I still don’t believe I sipped alcohol in front of papa. But that’s about my papa he knows how to mold himself and understand his kids when time is right :) Simple living, high thinking :)

I am so unlike papa in terms of food choices, what he likes the best, I dislike the most. I am more like maa :) So growing up I never really liked the combination of daal roti (lentils and Indian flat bread or chapati) I was more daal chawal (lentils and rice) kind of a girl. Any daal in any form, just give him roti and he would be the happiest person on earth. Me and mom loved daal but just with rice. But something happened; I got married to a daal roti person, just like papa-huge sucker of daal roti combination. 


So every time we visit my home in India, my mom makes different kinds of daal for my husband and papa. This time she made Panchmel Daal or Panchpuran Daal or Panchtatra Daal which is the combination of five kinds of lentils. There is a Punjabi way to make it where you add lots of ghee and garlic but maa made it in authentic rajasthani style, a marwadi way. This daal is usually paired with baati (Rajasthani dish) and churma. 

To make the best panchmel daal you need:
  • To soak the lentils for atleast half an hour.
  • Pressure cook for 2 whistles. Grains must be visible, over mushy daal is not authentic marwadi daal.
  • Mix of 5 lentils which is bengal gram dal (chana dal), black gram (urad dal),yellow gram dal (moong dal), green gram dal (moong chilka dal) pigeon peas spilt and skinned (arhar, tuvar, toor, tuar dal). But even white urad daal, red masoor dal or moth beans work fine.
  • 5 whole spices- red chilli (sukhi lal mirch), bay leaf (tej patta), cumin seeds (jeera), fennel seeds (saunf) and mustard seeds (rai).
  • Ginger is must but garlic isn’t. You can garlic too, but it is not must.
  • And ghee, a good quality Indian ghee (clarified butter).
 This is a simple dal but the flavour values are truly amazing. You need basic indian spices and little time to cook this dal, cook slowly to have creamy and thick dal. I like to have with jeera rice and it is roti (as you know now) for Mr. Husband.


Author: Shweta Agrawal
Serves: 3-4
Cusine: Indian: Rajasthani: Marwadi

Ingredients:
2 cups of dal. Mix of equal quantities of:
bengal gram dal (chana dal), black gram (urad dal),yellow gram dal (moong dal), green gram dal (moong chilka dal) pigeon peas spilt and skinned (arhar, tuvar, toor, tuar dal).
4 cups of water
2 whole red chilli
1 bay leaf/tej pata
1 teaspoon cumin seeds/jeera
1/2 teaspoon fennel seeds/saunf
1/2 teaspoon mustard seeds/rai
1 teaspoon ginger minced or grated
2 green chillies slitted
1/2 teaspoon turmeric powder/haldi
1/4 teaspoon red chilli powder
1/4 teaspoon garam massala
1/4 teaspoon aesofetida/hing
3 tablespoons ghee
1 tomato finely chopped
1 teaspoon lemon juice
2 tablespoons chopped coriander leaves
1/2 teaspoon kasturi methi to garnish (optional)

Method:
Wash all the lentils. Soak in water for 40 minutes. After 40 minutes drain the water.
In a pressure cook add 4 cups of water, washed lentils, turmeric powder and little salt. Cook for 2 whistles.
In a wok or kadai heat 2 tablespoons ghee. When ghee gets hot add cumin, mustard seeds, fennel seeds and bay leaf. Break whole red chillies and add it too.
Add aseofetida, green chillies and minced ginger. Cook for 30 seconds.
Add chopped tomato. Mix in turmeric powder, garam massala, red chilli powder and salt. Cook covered for 1 minute or till tomato turn soft and mushy and you see oil appear on the edges.
Add pressure cooked lentils. Add lemon juice. Check salt. Cook covered on slow heat for 10-15 minutes. 
Just before serving add remaining 1 tablespoon of ghee.Garnish with chopped coriander leaves and kasturi methi.


Notes:
You can use other lentils as well, like white urad daal or red lentils.
If you don't like ghee, feel free to use oil. You can decrease the amount of ghee if you are a weight conscious person ;)
You can boil lentils in open pan as well, it will take more time. Pressure Cooker saves time and it is really worth investing in a good cooker if you like to cook Indian dishes.
Kasturi methi (dried fenugreek leaves) is easily available in any Indian grocery store. I used MDH one.

Serving suggestions:Serve with plain basmati rice, jeera rice or any indian bread.
Serve as a side with dry indian curries like gobi matar, gajar matar or bhindi pyaz.
Pair with bread sticks or bread and serve like a soup.
It will be a great combination if served with rajasthani baati.
Make a complete marwadi thali. Serve along marwadi aloo pyaz ki subji, marwadi lehsun chutney and bajre ka rotla.

Thursday, June 18, 2015

Achari Gobi: Cauliflower With Pickle Spices: Side Dish


So, did you know Indian marriages are mostly arranged, when two strangers and their families meet, talk and decide to get their kids married. However ours was a bit different case, we met through families but before getting engaged we wanted to give each other sometime, get to know one another-long phone conversations, internet chats, Skype calls, sharing pictures and secret meetings and here we are.

Now here is the funny thing, we converse for hours about our lives, personnel issues, families, commitment and what not but we never talked about food choices- never ever! After marriage came in lot of surprises or shocks-whatever you call it. Initially it was irritating but slowly with togetherness we have now set in tune with each other’s choices. One of the best example will be how I started enjoying mangoes; you can read the whole story here. Or how he too loves spicy food nowadays the way I do.


But...some habits die hard. Some things you can’t wipe out from one’s mind. I tried hard, really hard but failed to make him fall in love with cauliflower dishes. I cannot eat or even cook Gobi/cauliflower when Mr. Husband is around. It happened once when he was eating gobhi sabzi and he saw a moving worm or keeda in it and rest as we say is the history. An apt equation that could explain his hatred towards gobi is- dislike for gobi = love for chocolate. Now you understand how serious I am? Sigh!

So whenever Mr. Husband isn’t around and is travelling for his office purpose, I bring this beautiful flower (phool) at home and treat myself *evil smile*. So once I made this spicy Kadai Gobi and the other time I cooked Punjabi Gobi Matar- do check them out. For today I prepared Achari Gobi (Cauliflower with pickled spices).


Achari or pickled spices are the mix of mustard seeds (rai), fenugreek seeds (methi), nigella  seeds (kalonji) and fennel seeds (saunf). These spices are not hot or spicy infact they are bitter in taste and have very strong aroma. You need to dry roast these spices and then use it, this then helps to give curry a very unique and piquant taste. I like to grind the roasted spices into fine powder, but you can use whole or coarse powder as well. This is a dry (suki) vegetarian side dish with indian breads such as puri, paratha or chapati and goes well with rice and daal as well.Don’t let ingredients list intermediate you, this curry is indeed easy and worth all the steps. Here is how to make Achari Gobi.

Author: Shweta Agrawal
Serves: 2-3

Ingredients:
1 medium cauliflower/gobi
1 whole red chilli
1/2 teaspoon mustard seeds/rai
1/2 teaspoon fenugreek seeds/methi dana
1/2 teaspoon fennel seeds/saunf
1/2 teaspoon nigela seeds/kalonji
1/2 teaspoon cumin seeds/jeera
1 onion medium size chopped finely
1 tablespoon ginger garlic paste
3 tablespoons yogurt/dahi
2 tablespoons lemon juice
1 teaspoon sugar
1 teaspoon red chilli powder (adjust as per taste)
1/2 teaspoon turmeric powder/haldi
1/2 teaspoon coriander powder/dhaniya
2 tablespoons oil + 1 tablespoon
Salt to taste
Coriander leaves to garnish
Kasturi Methi to garnish (optional)


Method:

  1. Cut cauliflower into florets. Wash and drain the water.
  2. Dry roast red chilli, mustard seeds, fenugreek seeds, nigella seeds and fennel seeds on a slow flame till aroma is released. Let it cool down. In the spice or coffee grinder, grind it to fine powder.
  3. Mix lemon juice in the above spice mix and keep it aside.
  4. Heat oil in a pan or wok. When hot gets hot add cumin seeds. When seeds crackle add ginger garlic paste and onions. Cook till onions are soft and raw smell of ginger garlic fades away. Turn the flame to slow.
  5. In a bowl mix yogurt with turmeric, coriander powder, red chilli powder and sugar. Put this mixture in the pan and cook covered for 5 minutes.
  6. After 5 minutes add grinded pickled mix. Cook covered for 2 minutes. The sauce must turn thick.
  7. In separate pan add 1 tablespoon oil. Add cauliflower florets and saute it for 10 minutes on a medium flame adding a pinch of salt until they turn light brown in colour. Transfer into a paper towel and keep it aside.
  8. Add cooked cauliflower in tomato sauce. Cook covered for 2 minutes. The spices must coat cauliflower. Check salt. Serve with chopped coriander leaves and kasturi methi.


Notes:
You can use green chillies instead red chilli powder. For dark red colour use kashmiri red chilli powder.
Agian, I like to grind my spice mix to fine powder. You can use whole or coarsely grinded spices too.
Kasturi methi is dried fenugreek leaves, it is optional. It is  is easily available in any Indian grocery store. I used MDH one.

Serving suggestion:
Goes well with any indian breads.
Serve as a side with rice and daal.
Just roll up in the parathas, or rotis. Great for tiffins and lunch boxes.