Thursday, May 30, 2013

Orange Cupcakes, Butter Cream Icing And Some Guessing :)


Once you are back from holidays it takes some days to get back to normal routine and start blogging again. Finally today, after 12 days I am here to share a new recipe with you all. I was planning to make orange cup cakes for a long time, but I kept on postponing it for some or other the reasons. When I came back from holidays I just wanted to make them this time without giving any second thought :)

This time I took some tips on how to make perfect cupcakes from bakingmad.com and I was happy with the texture and softness. BakingMad has some amazing collection of recipes for cupcakes, scones and breads and many more. It is always so good to browse through their site and look for interesting recipes.

Coming back to the recipe. Orange cup cakes are very fresh and have subtle aroma and flavour of tangy oranges. I opted to make butter cream icing because butter cream icing is generally sweet and thus balances really well with tangy orange taste. If you are wondering why I chose pink and blue colour, then yes there is a reason for it. It is an idea for baby shower. Last year British summers were very exciting with Queen diamond jubilee celebrations and Olympics and this year we will soon have a royal baby. I think and feel that royal baby will be the girl. What do you think guys? Girl or a boy? Please leave comments below.


Ingredients:
For the cupcakes
2 cups self raising flour
1 ½ cups softened butter
2 cups castor sugar
1 teaspoon baking powder
3 medium size eggs
1 Orange zest
Juice from one lemon

For Butter cream icing:
1 cup unsalted butter (2 sticks or ½ pound), softened (but not melted!)
3-4 cups icing sugar sieved
1 tablespoon vanilla extract
up to 4 tablespoons milk or heavy cream
2 drops of pink and blue food colours


Method:
For the cupcakes
  • Line the 12 cup cake liners in cupcake moulds.
  • Preheat the oven at 180 C or 160 C (If using fan oven) for 10-12 minutes.
  • Cream together butter, orange zest and sugar till it becomes soft and turns in pale yellow colour.
  • Keep mixing one egg at a time and beat for 5 minutes.
  • Sieve the flour and baking powder. And mix slowly 2 tablespoons at a time in the butter mixture. Keep repeating till the whole flour is incorporated.
  • Finally add the orange juice and give quick mix.
  • Bake for 20-30 minutes or till the skewer inserted in the centre of the cupcake comes out clean.
For Butter cream icing:
  • Beat butter for a few minutes with a mixer on medium speed. Add 3 cups of powdered sugar and turn your mixer on the lowest speed (so the sugar doesn’t blow everywhere) until the sugar has been incorporated with the butter. Increase mixer speed to medium and add vanilla extract and 2 tablespoons of milk/cream and beat for 3 minutes.
  • If your frosting needs a more stiff consistency, add remaining sugar. If your frosting needs to be thinned out, add remaining milk 1 tablespoons at a time.
  • Divide in two equal quantities and mix colour.

Notes:
Always use the ingredients at the room temperature.
Baking time may differ from oven to oven, however if the cake turns golden in colour and is still under cooked than cover it with baking paper and then bake.
This cupcakes taste good with chocolate icing as well


Taste:
Slightly sweet zingy and soft.

Sunday, May 26, 2013

An Iberian Experience :) Spain And Portugal. Indian Vegetarian Experience

Yes yes! I am back. Where was I? I went for a holiday. I and my hubby went to Spain (Barcelona) and Portugal (Lisbon) for a week. I must say both the cities were poles apart from each other. Barcelona on one hand is bigger and crowded; Lisbon on the other is smaller with large hearted people.

Barcelona is a city for everyone. It has something for kids, thrill seekers, beach lovers, architecture enthusiastic or people in search of peace and calmness. I just enjoyed walking around the city. We walked around old city, small lanes to huge squares, saw famous buildings, churches and also the ones where tourist do not go. Barcelona is all about walking and then stopping and gazing around. Gaudi’s buildings are the famous ones in Barcelona and one can’t miss them. All his work is inspired from nature; he liked the mosaic tiles work, the wavy buildings, tree like churches and many more. Being a food lover, I must say Barcelona does not disappoint vegetarians. We had Tapas (small portions of food) and Paella (Sticky kerala rice biryani); both these dishes are very famous and tasty and you will find most of the restaurants selling them. In drinks, people love to have Sangria –it is fruit wine punch with hint of brandy and is served in 2 litre glass jug with some ice cubes; it is very yummy and even if you do not like wine, I am sure you will enjoy this drink. For Barcelona-Colourful is the word- a perfect blend of nature and culture.

Little Tapas, Fruity Sangria and Colourful Paella
Wavy Casa Mila La Pedrera, On its roof and Wavy Balconies
The Chruch-Sagrada Familia, Looks like tree branches from inside and beautiful mirror work

Talking about Lisbon; it is a very cute city on hills. We stayed there for 2 days and totally enjoyed every bit of it. One thing that I will never ever forget about Lisbon is the Tram 28. A bright yellow train making its way through curvy tree-lined streets, hilly areas, the old quarters- What an historical sight it was!!.. We hopped off and on where we wanted and enjoyed the ride. On the hill we saw an Indian Restaurant named Agra and we jumped in. We had delicious chana masala, jeera rice, garlic naan, palak paneer-I still can’t forget the taste. Yes! Portuguese food is like Goan food (fish and rice) so we being vegetarians were very happy finding an Indian place to eat. During our walking tour, our guides took us to Alfama which is tiny city (more like village) with really very narrow paths and streets. There we tasted Ginjinha- a sweet alcoholic drink infused with the flavour of cherries. It was a good and different drink served as tiny shots :-) Next day we went to tourist attractions like Belam Tower, Abril Bridge and Jerónimos Monastery. Just across the Belam Tower is Belam Pastries Shop who sells these amazing Custard Tarts, which is famous all over the world. And you will be shocked to know that on Christmas they sell 40,000 pieces of it. It is more like puff pastry as the base with slightly warm custard, hmmmm delightful :). So, if you are a non vegetarian do go there, you will love the food, the music, and the city :). For me it was about hills, trams and the people :)

The famous Pasties De Belum and its Custard Tarts
US With The Lady Who Sells Ginjinha
Lisbon Top View and Hubby @ Belum Towers
My Favourite- Tram 28
I hope you all will like the post. Comments please :) :) :)

Friday, May 17, 2013

Paneer Kofta Curry / Cottage Cheese Dumplings Curry- A Royal Treat


Paneer is like a chicken for vegetarians. Whenever we have some special guests coming at our place for dinner or lunch one thing that will always be there in the menu is Paneer. Let it be matar paneer, achari paneerpaneer corn burji, malai palak paneer, paneer tikka masala, kadai paneer or the most royal one -Paneer butter masala.

One can make so many dishes from paneer. Our good old Indian cheese is so versatile that it is used in starters, main course, parathas and even desserts. I made paneer some days back and I did not have time to wait till paneer firms to be cubed out. Thus I had to use the curdled panner, so I opted to make paneer kofta curry. Hmmm! What else, it started raining and the weather played an important role in setting the stage :-) Below are the Ingredients

Ingredients:
For The Koftas:
Crumbled Paneer-2 cups
Bread slice-2
Red Chilli Powder/lal mirch-1/2teaspoons
Salt- to taste
Chopped Coriander Leaves/dhaniya -2tablespoon
Chat Masala Powder-1/4 teaspoon
Oil-For Deep Frying
For The Gravy:
Butter/Makkan-3 tablespoon
Tomato/ tamatar-3
Onion/ Pyaz-2
Garlic/ Lehsun -5 cloves
Ginger/ adrak-a small piece
Garam Masala-1/2 teaspoon
Red Chilli Powder/ lal mirch -1 teaspoon
Turmeric powder/ haldi-1/4 teaspoon
Clove/ laung-1
Cinnamon/dal chini-a small piece
Coriander Leaves/ dhaniya-2 tablespoon

Method:
For Koftas:

  • Mix all the ingredients along with the bread slices to form soft dough.
  • Heat oil in a kadai/wok
  • Divide the dough into equal parts and shape each portion into a ball.
  • Deep fry the balls until golden.
  • Keep it aside.


For the Gravy:
  • Grind tomatoes to form puree.
  • In a mortar and pestle, pound garlic and ginger to a coarse paste.
  • Heat butter and when it starts melting add cinnamon and clove.
  • Add chopped onions and saute till golden.
  • Add the ginger garlic paste and saute till the raw smell is gone.
  • Add the tomato paste along with the red chilli and garam masala.
  • Add salt and turmeric. Mix well and let it cook until dry. When butter starts floating, add enough water to bring it to gravy consistency. 
  • When it boils, add the koftas and coriander leaves and switch flame to low.
  • Cover and cook for 2 minutes. Serve hot with any flat bread.
Notes:
  • Red chilli powder can be adjusted as per one's taste.
  • Bread can be replaced with 1 medium size boiled mashed potatoes.
  • If paneer is not home made, then grate it with grater and then use.

Taste:
Soft dumplings in spicy sauce 


Look more paneer recipes here

Wednesday, May 15, 2013

New York Style Pizza, From Scratch With Vegetables Toppings


Who doesn’t know about Pizza? Pizza is an oven-baked, flat, round bread typically topped with a tomato sauce, cheese and various toppings. Pizza was originally invented in Naples, Italy, and the dish has since become popular in many parts of the world.

The word Pizza makes our mouth water and adds smiles to our faces. Therefore before I go ahead I will like to share some fun facts about Pizza.

  • The average pizzeria uses roughly 55 pizza boxes per day.
  • The highest-grossing single-unit independent pizzeria in the nation, Moose's Tooth Pub and Pizzeria, is in Anchorage , Alaska. Its annual sales are approximately $6 million.
  • 36 percent of all pizza orders want their pizza topping pepperoni
  • 94 percent of Americans eat pizza regularly.
  • Cheese wasn't added to pizza until the late 1800s.
  • Frozen pizzas were introduced to Americans by the Celentano Brothersin 1957. At that time, frozen pizzas were only available in grocery stores.
  • The largest pizza in the world was made in 1990 at Norwood Hypermarket in South Africa. For the pizza, they used 500 kg of flour, 800 kg of cheese and 900 kg of tomato puree. The pizza was measured 37.4 meters, enough to secure an entrance in the Guinness Book of Records as the largest pizza ever.
  • The most expensive pizza was created by Domenico Crolla who used edible gold, medallions of venison, sun blush-tomato sauce, Scottish smoked salmon, lobster marinated in fine cognac and champagne-soaked caviar. His pizza was sold at auction for charity with price of about #3000.00.
I hope you all enjoyed reading these facts. Moving to the recipe, this month’s task from  Baking Partners group was to make pizza. Making pizza from starch only sounds tough but making it is very simple and fun. I am happy that I got the chance to try my hands on New York Style Pizza. I was so happy and amazed by its taste and texture. I opted to make thin crust pizza (Mr. Husband likes it this way) with lots of vegetables as toppings. All I can say is there is no pizza better then homemade pizza :)

Recipe source - Serious eats
Recipe suggested by - Archana of Tangy minds


Ingredients:

For pizza dough (for  1 very large pizza or 2 medium ones )
Bread flour - 2 1/4 cup
Salt - 1 1/ 2 tsp
Lukewarm water - 1 cup
Sugar - 3/4 tsp
Instant yeast - 1 tsp
Olive oil - 2 tbs

For pizza sauce
Peeled plum tomatoes - 1 can
Extra virgin olive oil - 1 tablespoon
Red pepper flakes - pinch 
Salt
Basil leaves - 2 sprigs
Unsalted butter - 1 tablespoon
Garlic cloves - 2 medium (grated)
Onion - 1 medium (chopped)
Sugar - 1 teaspoon
Dried oregano - 1teaspoon
Salt - as required 

For topping
Mozzarella cheese– ½ cup grated
Parmesan cheese- ½ cup grates
Vegetables- ½ red, yellow and green capsicum (cubed), ½ onion (sliced), ½ cup cherry tomatoes (chopped rounds)

Method:

For the dough
  1. In a bowl combine bread flour, salt, olive oil, yeast, sugar and add lukewarm water to it and knead well for about 10 -15 minutes just like chapatti dough. Keep the dough covered for 30 minutes and then knead again. This time you will reach at a point where the dough will be stretchy and must pass window pane test.
  2. Divide the dough in 2 equal parts and keep in the Ziploc bag in the fridge for minimum 24 hours and maximum up to 5 days. Remember to take out the dough from fridge at least 1 hour before baking (to bring it to room temperature).(I kept my dough overnight and used it next day)

For the sauce
  1. In a blender blend the canned tomatoes. Do not puree it, blend to form chunky mixture.
  2. In a pan heat butter and olive oil and when butter melts throw in grated garlic, oregano, pepper flakes, pinch of salt and cook for 2 minutes.
  3. Add tomato puree, chopped onions, basil sprigs, and sugar and bring it to simmer. Let it cook for about 1 hour (stiring in between) till the sauce thickens and reduces t half.
  4. Mix salt and let it cool.

For Baking:
  1. 1 hour before baking; preheat oven to 400F/ 200C. Turn single dough ball out onto lightly flour surface. Gently press out dough into rough 8-inch circle and then roll the dough like a roti with rolling pin to form thin crust. Transfer to pizza pan.
  2. Spread approximately 2/3 cup of sauce evenly over surface of crust. Add all the vegetables toppings evenly and spread 1/3 of cheese over sauce evenly.
  3. Bake until cheese is melted with some browned spots and crust is golden brown and puffed, 10 to 15 minutes or varies depends on your oven
  4. Transfer to cutting board, slice, and serve immediately.


 Do let me know your favourite pizza toppings in the comments below :)

Here is what others have made

Tuesday, May 14, 2013

Tuesday's Tip- How To Keep Pests Out Of Rice

My Tuesday’s tip section is getting very good response from my readers. I received some very good comments on how to cook rice perfectly, thus today I thought of catering to another problem- Rice Pests.

I know it is not rare to find rice bugs or pests inside the rice packet. Sometimes the bugs are already inside the new packet as the bugs lay eggs in the crops, and when these are harvested, the eggs end up in the package. Eggs are so tiny that they are not visible to the naked eye, only when the eggs hatches you can see the pests. There is also a possibility of bugs sneaking into the package after you open it and store it at home.

There are some tricks that you can try and stop pests invading your rice grains.
Methods to Keep Pests Out Of Rice:

Freeze the rice
Yes! This may sound stupid but it helps. As and when, you bring the new packet of rice; simply freeze the bag in the freezer for 1 week. Doing so stops the eggs from hatching. In fact if you have room in the freezer consider storing the rice in there, this will absolutely keep pests away from rice.

Show sun: 
One of the main reasons of bugs to multiply is the moisture. When you find insects in the rice grains; spread the rice on newspaper and keep it under the sunlight. Sunlight heats up the rice slowly and removes the moisture. Once the rice has been thoroughly dried, store in clean, sealed glass or plastic containers.

Add leaves: 
This is easiest and commonly used method. People from centuries are adding strong flavoured leaves to their rice containers. Depending where you live different kinds of leaves can be used to stop insects multiplying in the rice. For example in India neem leaves are used. If you cannot find neem leaves, add in bay leaves and store the rice. Just remember to use dry leaves and not the fresh ones.

Store properly: 
It is very important that you use good quality food plastic containers for storing the rice. Plastic container must be strong and must have very good gripped lid. A proper air tight container not only helps to keep the air out, it will also help prevent pests from getting into your rice. If not plastic, then the next alternative is the use of glass containers, again the ones with tight lid.


Do try these methods, so when the next time when you scoop out rice to prepare the meal you don’t discover some creepy crawlies. Yuck!

* Disclaimer :::: Not all the information mentioned above is my own and some of it are taken from various books and online sources like Google including the pics. My pics will have my logo on them , rest all are taken randomly from Google 

Sunday, May 12, 2013

Mom's Special Baigan Bharta On Mother's Day, Step By Step And Video Tutorial


"God created someone who is wise & who only knows to love and make sacrifices.. One who encourages and one who never gives up.. In short, God created WOMEN… For me that special women is my Mother.

On the occasion of Mother's Day I planned to make my Mom’s special Baigan Ka Bharta. This dish reminds me of the days when I hated to eat baigan and she used to explain me that one must not be so fussy and eat all the vegetables. I know the efforts she made to make this dish so that I can enjoy and forget that it had baigan in it. And yes! I must say she was successful (like always) and I relished the subzi. I still do not know what was so special about the method-all I know is that she cooked with love.

All of us have one women who means a lot to us. For me, it was always my mother. She is my guide, friend and my support. I can’t thank her enough for all her sacrifices and endeavours she has done to make me what I am today.  

Today’s post is for her. Happy Mother's Day.


Watch the Video Tutorial


Ingredients’:

Baigan/Brinjal/Eggplant- 2 medium size
Pyaz/onion-1 chopped
Garlic/lehsuni- 5-6 cloves
Tamatar/tomatoes-2 chopped
Coriander/dhaniya seeds- 2 tbsp crushed
Green chillies/hari mirch-2 chopped
Red chilli powder/lal mirch- 1 tsp
Turmeric powder/haldi- 1tsp
Coriander/dhaniya powder- 2tsp
Garam Masala-1/2 tsp
Cumin seeds/jeera- 1tsp
Salt to taste
Oil- 5 tbsp

Method:-
Wash baigan thoroughly. Peel of the skin and chop in rings. Take a microwave safe bowl and add 3 tbsp of oil in it. Also mix garlic cloves in the bowl. Coat everything in the oil well.


  Put the baigan clove mixture in the microwave on high for 15 minutes. After 15 minutes cover with lid and cook for next 5 minutes.
 Heat remaining oil in the pan. When oil gets hot, add cumin seeds. Let them crackle.
 Once seeds gets brown, add chopped onions.


After onions mixes chopped green chilies.


 Mix in it crushes coriander seeds and stir well. Let the whole vegetable mixture cook for 5 minutes or till onions get pink in color.
 When onions are done, mix the microwaved bargain-garlic mixture.
 Next, throw 2 chopped tomatoes and mix well.
 Add in some salt to taste.
Throw red chilli powder.
Next goes in Coriander /dhaniya powder
 Haldi powder/turmeric.
 Add some garam masala
 Finally add 1/2 glass of water.
 Mix everything really well.
Cook it with lid on for 5-8 minutes or till oil separates and tomatoes are mashed up.


 Serve Hot with rice or paratha of your choice.


Notes:
I added 2 chopped chillies because the chillies were not very hot.
I microwaved  baigan, it can be roasted on the gas top or can be grilled in the oven as well.


Taste:
Spicy, hot with smoky flavour of baigan

Linking this for Mom's Special event

Friday, May 10, 2013

Tempting Mango Chocolate Chips Muffins- Guest Post By Manju Of Desi Fiesta


Blogging has so many advantages - it is exciting, it gives us an identity, it is so much fun, but above all it is the platform where people with same passion that is cooking come together. One such person who has become my very good blogger friend is Manju of Desi Fiesta.

She participated in one of my events and send in some very innovative recipes. She won the competition for her wonderful Masala Cone recipe. Her blog as the name suggests is loaded with desi dishes with international twists. Some my favourite ones are Chocolate paan, Heart Beet Whoopie Pie Cake and of course Ghevar

We both always chat with each other and always have something new to talk about. I love the way she always adds the word DEAR after or before any conversation. I am glad that she agreed to guest post for me and it is my pleasure to bring before you’ll Manju. I happy to announce that Merry Tummy lovesDesi Fiesta .

Off to Our little chit-chat

Shweta- What made you start blogging? How long have you been blogging? Is there any particular etiquette that you like to maintain while blogging?
Manju-Hi everyone !! First of all, I am so glad to be here at Shweta's space. Thank you- Shweta for giving me this lovely opportunity of bring my recipe to your space :). Now coming to you question. I used to share my food pictures on Facebook and my friends where very curious in knowing all the recipes .. So this is what made me start a blog so that I can have my recipe collections in a place where all my friends can enjoy reading them :).  I started this blog as I am passionate in cooking and explore my kitchen a lot. And by blogging now I have earned so many lovely like minded people who are so supportive and encouraging. I blog and that makes me feel so happy when my blogger buddies encourage me!! And I feel so excited and have fun while blogging that I never follow any etiquette and I don't even want to, because I want my blog to stay as my stress buster and not a stress producer :). 

Shweta- That is so interesting. Which is your favourite ingredient in the kitchen and why?
Manju-My favourite ingredient in my kitchen which like to use frequently is - Cardamom. I add cardamom in all gravy and rice recipes a lot as my H likes the flavour of cardamom in any gravy /sabzi/pulav.. It adds an extra flavour to any dish and makes the dish so aromatic. The aroma really tempts the people to have any dish in which we add cardamom.

Shweta- Hmmmm! Cardamom  I am sure is any Indian’s beloved spice. Which ingredient scares you the most and why?
Manju-I love to explore with all new ingredients. So till now no ingredient scares me :) But my h is scared of having cauliflower a lot. He never even wants to taste it as he saw some worms coming when he went for grocery shopping. - So he hates it. But I have all veggies  and no such veggie or ingredient which I have explored and experimented with scares me .If you ask me should be some ingredients which scare me which don't even want see is any Non-vegetarian  ingredients including Egg. As I am a pure vegetarian I hate to see Non-vegetarian ingredients.

Shweta- He he! My hubby to hates cauliflower and the reason is same “Worms”. How do you spend your time other than cooking and blogging?
Manju-Oh that’s a good question! :)  I have 2 year old kidoo at my home and she always has some work for me to do :P So I always do those work as my routine. I like to watch new movies either it may be Tamil/Hindi/English/any foreign language with English subtitles, Other than that I love to play with my daughter a lot :)  That’s how I spend my whole day.

Shweta- Oh! So you are a movie fan. Like any other profession, I am sure cooking also has its share of difficult instances. Any such awkward moment?
Manju-As everyone know I did my Home science with computer science when I was in school. So we were introduced to use new terms and equipments. I have never even used mixer grinder, as I was scared to use it and had no idea how to operate it. Thus when my mom told me grind for chutney it came out as a green juice: P And Yes this was an awkward moment in my cooking.

Shweta- That was very funny! I can see some real wonderful food pictures in your blog. It is said that one eats with his/her eyes before actually tasting the food. Do you believe so-your comments?
Manju-It is surely true if your food looks good it will taste delicious for sure :).  Every foodie eat the dish with his/her eye first and then comes to the taste. So presentation is so important while doing food photography. I am still a beginner when it comes to photography. I am learning so much from my senior bloggers ‘and my very good buddies :) Who have been a great help in improving my blog and now they are helping me to improve my photography. So glad that I found such true friends in this virtual world :).

Shweta- So you totally love blogging. Which is one thing that you do not like about blogging?
Manju-It’s so much fun and I feel so happy to share my recipes in my blog .It is a very good thing to share is thoughts while sharing our recipes. Till now I have been enjoying blogging and no such thing has made me think any dislikes in blogging. I am excited every day to share recipes and even learn new recipes from our blogger buddies. So I don't have any particular thing which I don't like in blogging :)

Shweta-So, Which is your most proud moment in the blogging?
Manju-Till now I have so many proud moments that I am going to treasure my whole life :) I have won so many giveaways and so happy to get recognition from all my readers :). When I posted "Ghevar" ,which is the most popular dessert in my blog. I did it for SNC challenge conducted by Divya. I got an huge response for that post and still people are appreciating me as they tired and tasted my recipe. So ghevar brought me to limelight :) It was my happiest moment in my blogging world :)

With warm welcome over to Manju.

I am so glad and they were very lovely questions which made me to think a lot :) Shweta has been so kind and I love her collection of recipes a lot :) I like here bakes and innovative recipes. One such recipe is “cake churma “with leftover cake crumbs that was really a very innovative recipe.

Now, I have got a seasonal recipe for you Shweta. Hope you will like :)


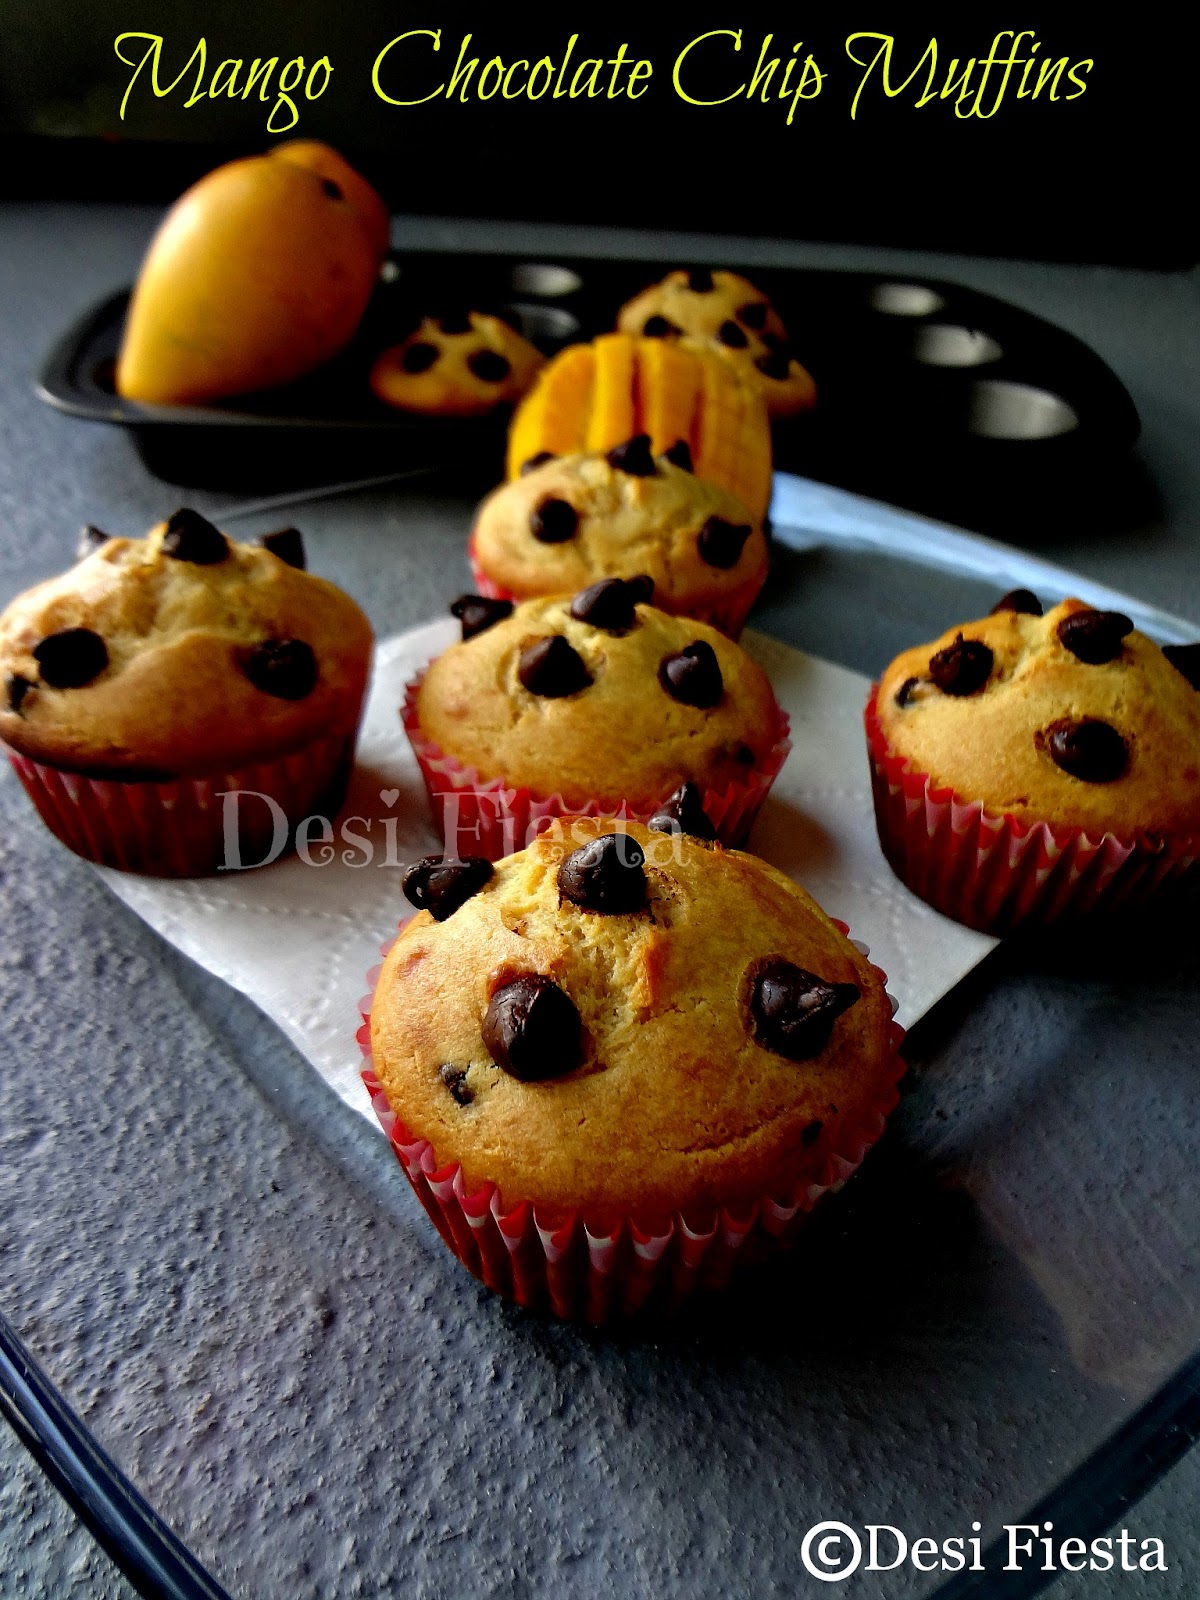
I love mangoes and I am hunting for mangoes every week: P . So, I have come with this delicious recipe with my favourite fruit to share with you all. This is an yummy combo of mango and chocolate. They are so very moist and both mango and chocolate compliments each other so well. These muffins make perfect snack for tea time. I saw this recipe in a cooking show long back and made a note on my recipe to do list . Thought is will be the perfect treat to share with all the readers and Shweta  :)

Ingredients:
1 cup plain flour (maida)
1/2 tsp baking powder
A pinch soda bicarbonate/baking soda
8 tbsp condensed milk
5 tsp chocolate chips
4 tbsp mango pulp
4 tbsp melted butter
A few drops of vanilla essence
Cupcake liners - 8-10

Method:
Sieve the flour, baking powder and soda and baking powder in a bowl. Keep aside.
Combine the condensed milk, mango pulp, butter (melt the butter before adding) and vanilla essence in another bowl, mix well and keep aside.

Add the flour mixture and mix gently using a wooden spoon or spatula.
Add enough water (approx. 2 tbsp) to get a batter of dropping consistency.
Pour 1 tbsp of the mixture into each of the 10 line muffin moulds with the cupcakes liner or you can even grease and dust them with some flour .


Sprinkle ½ tsp chocolate chips evenly on it and bake in a pre-heated oven at 350 F for 15 to 20 minutes or until a toothpick inserted in a muffin comes out clean.

Tips:
Combine dry ingredients with wet ingredients in batches and don't add them in one go to avoid lump formation.
Don't over mix the muffin batter just fold the dry ingredient till well combined.
Cool slightly, unmold and wrap in an aluminium and foil or cling film or pack in a Tiffin box.
Instead of condensed milk you can substitute with 1/2 cup sugar and 1/2 cup milk (you can adjust this to make the batter dropping consistency)


Thank you from Merry Tummy