Tuesday, April 30, 2013

Tuesday's Tip- No Overnight Soaking, Quick Soak Method For Legumes


We all have so many things to do for the whole day, sometimes this and sometimes that. We live in such a busy world with our minds thinking about so many matters at one time. Ok! Yeah, there is a reason why I am talking about being busy and stuff, because in our schedule we all always need to remember one thing that is to soak beans or legumes overnight.

Preplanning the next day’s meal and remembering to soak the beans overnight can sound like an insurmountable task. Well for me it is always, I sometimes even have to set up an alarm on my cell to remind me that I have to soak beans.

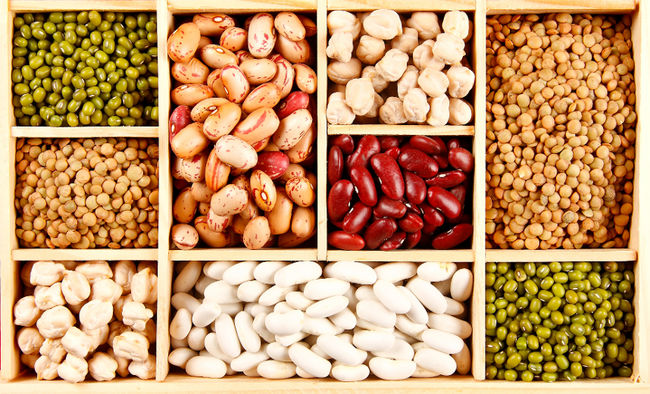
I tried another method which I named as “Quick Soak Method” which is so helpful and easy that without any pre-planning I can still make beans. This method can be followed for any legumes that needs overnight soaking like rajma/ red kidney beans, chola/chickpeas, black eyed beans , kala channa etc etc.

Quick soak method -Rinse beans or any legumes you are using in cold water. Put them in a large pot and cover with about 3 inches of cold water. Bring almost to a boil (small bubbles appear around the edges of the pot), cover, and remove from heat. Let it sit for 1 hour. Drain. The beans will be "soaked" and ready to cook.


Using this method the beans will be doubled in size and will be ready to cook (just at a stage of overnight soaking condition). Simple follow the recipe and use your beans.

Do try this quick soak method and enjoy your legumes today.


* Disclaimer :::: Not all the information mentioned above is my own and some of it are taken from various books and online sources like Google including the pics. My pics will have my logo on them , rest all are taken randomly from Google

Monday, April 29, 2013

Peas Onion Paratha, Crispy And Spicy Indian Flat Bread


There is nothing more special then scooping out spicy curries with fresh and crispy parathas. The word Paratha breaks down to Parat (layer) + Atta (flour). Paratha is just a general term which means unleavened flaky, multi- layered bread cooked on the tawa or the griddle. Parathas are everyday kind of bread in India. There are so many ways and types of making parathas. I looooooove parathas, why? Because they are my favourite any time meal; one can have it in breakfast, lunch, evening snack and even dinner.

I have made so many kinds of parathas on my blog and I seriously can’t choose one that is my favourite; I mean they all are so different in taste and flavour that each one is special in its own way. I cooked mutter that is peas and onion parathas. Generally peas are used to make stuff parathas like I have made here, but this time I cooked peas and onions and add them to the flour mixture to form the dough. You do not have to form proper round shape bread, because the uneven edges give the nice touch and look to the bread. Let us look at the recipe.


Ingredients:
1 ½ cups whole wheat flour/atta
½ cup all purpose flour/maida
2 tablespoon gram flour/chickpea flour/besan
½ cup peas/matter
1 medium size onion chopped
1 tablespoon ginger-garlic/lehsun –adrak paste (optional)
1 teaspoon butter/ghee
Salt to taste
2 green chilli chopped
1 teaspoon dry mango powder/amchur/khattai
1 teaspoon cumin seeds/jeera
1 pinch asafoetida/ hing
1 teaspoon oil
Oil for cooking

Method:
Heat 1 teaspoon of oil in a pan. When oil gets hot add cumin seeds, asafoetida. Let cumin seeds crackle.
Add onion, green chilli and ginger garlic paste. Cook till onions become soft.
Finally mix peas and salt. (I used frozen peas so the mixture got ready in 2 minutes, if using fresh peas it is better to boil the peas beforehand)
Lastly mix dry mango powder and let the mixture cool.
Mix wheat flour, all purpose flour, butter, gram flour and the above cooked mixture. Knead everything together well. Let the dough sit for 10 minutes. (You will need very little water to form the dough because of moisture content in pea’s mixture).
After 10 minutes, divide dough into 10 equal parts and give them a round shape of ball. Take 1/2 cup dry wheat flour in a plate for dusting. Take one dough ball, flatten it like Pattie and dust dry wheat flour over it. Roll out the paratha.
Place it on a hot tava/griddle and cook over medium flame. When tiny bubbles starts to rise on the surface, flip it and reduce the flame to low.
Spread 1/4 tsp oil around edges and spread over the paratha. Flip it again and spread 1/4 tsp oil around over it. Press it with spatula and let it cook over medium flame. Cook until golden brown spots appear on both sides.
Follow the same process for remaining dough balls.

Serving Ideas:
Serve hot with chutneyraita or pickle of your choice.
These are perfect to be served at breakfast, brunch and as evening or picnic snack.
Wrap up in the foil and serve in your kids’ or husband’s tiffin.


Taste:
Crispy and spicy

See many more interesting parathas recipe here

Tuesday, April 23, 2013

Winter Spice Ice Tea And A Review


I am sure there are few nicer things than sitting up in bed, drinking strong tea, and reading. Tea is such an important drink in our lives. Back in India I only tasted two types of tea –black tea and tea with spices and milk. Only when I came to London, I saw such huge flavours of tea; after all “tea is Britain’s favourite drink”. But it was not like this always; oh yes! There was a time when Britain only had gin, coffee and ale- even at breakfast. Slowly the time changed and so did the habits- people begin enjoying and tasting tea.

Twinings was there at that time. It is a brand which is 300 years old and has an amazing catalogue of flavours when it comes to tea. They have white teas, herbal teas, black teas, organic teas-Oh! You name it!!! I tasted Twinings winter spice tea recently, and I was so moved by the taste. It is naturally caffeine free and contains natural ingredients like cinnamon, hibiscus and blackberry leaves. The smell is the best part-once you open the packet your nose fills with aroma. Why not it has Cinnamon - my beloved spice.  All you have to do is brew the tea bags for 3 minutes and you get that perfect red colour and fragrance. The taste is mildly sweet and spicy, steaming with flavours.

Do you see the beautiful red colour??

The hot tea is indeed the best option looking at the weather of London, but I also experimented making ice tea with its tea bags. I loved the colour and cinnamon and blackberry leaves taste in the cold tea as well. I added in some sugar and lime juice to bring the authentic ice tea taste. Let’s see the recipe.

Ingredients:
3 cups of water
1 tablespoon of sugar
1 teaspoon lime juice
7-8 ice cubes

Method:
Heat 3 cups of water and bring to boil.
Add teabags in the boiled water and mix. Let it sit covered for 3-4 minutes. Discard the tea bags.
Add sugar to it and let it dissolve completely.
Pour cold water in the above mixture. Also mix in the limejuice.
Take glasses and add ice cubes in it. Slowly add the tea and mix well.
Enjoy the new flavourful ice tea.

Taste:
Refreshing, sweet and little spicy.


Disclaimer: I was not paid or told to write positive review. The post is based on my experience and is unbiased.  With thanks to Twinings for the review samples.

Monday, April 22, 2013

Spinach Muthiya- Gujarati Snack, Steamed Dumplings


As you all know that Mr. Husband loves Guajarati food a lot because of his Ahmedabad connection. Gujarati cuisine is very wide and has many options in snacks. Whenever I hear the word snack I generally picture the crunchy, deep fried and high calorie munches, which are of course not very good for our health.

Snacking is very popular in Indian families. We snack in the morning, before our lunch, supper and also before dinner. Why not?? After all our mothers, grandmothers make wide range of snacks from savoury to sweet. But things have changed a bit now, we have become health conscious and do not like deep fried snacks. One such healthy snack is Muthiya- a Guajarati dish of steam cooked dumplings with a goodness of vegetables.

It is a simple snack which is made with any grated vegetables mixed in some gram flour, selomina and spices to form the dough. Later the dough is steamed to perfection. There is no particular rule that one needs to follow to make Muthiyas. I made it with corn meal and spinach.

Ingredients: For Dough
Whole wheat flour – ¼ cup
Besan /chickpea flour/gram flour – ½  cup
Semolina/Suji/ Rawa – ½  cup
Corn meal/Makki ka atta-1 cup
Turmeric powder – ½ tsp
Spinach/palak- 2 cups washed and chopped
Asafoetida – ¼ tsp
Baking soda – ¼ tsp
Cumin seeds – ½ tsp
Fennel seeds – ½ tsp
Sugar – 1 tsp
Ginger paste – 1 tsp
Garlic paste- 1tbsp
Yogurt/curd/dahi-1 tbsp
Green chillies – 4, chopped finely
Coriander leaves/dhaniya – 10 sprigs, chopped finely
Lemon juice – 1 tsp
Salt – to taste
Oil – 1 tsp
For Tempering:
Oil – 3 tsp
Mustard seeds/rai/sarson – ½ tsp
Sesame seeds/til – 2 tsp


Method:
In a bowl mix wheat flour, besan, semolina, corn meal, turmeric powder, asafoetida, baking soda, cumin seeds, fennel seeds, salt and sugar.
Then add ginger paste, green chillies, chopped coriander, lemon juice and oil.
Squeeze out as much possible water from spinach.
Add spinach and curd to the bowl, mix well and knead it into soft dough. Use water only if needed.
Prepare steamer. Add about 5 cups of water and bring to boil. Then apply some oil on steamer tray and grease it well.
Apply some oil on your palms and divide the dough in to four equal portions. Shape each portion in to cylindrical log. Arrange on grease tray and steam it for 20-22 minutes.
You can check if Muthia is cooked by inserting a toothpick in it and it should come out clean.
Let it cool for 5 minutes then cut into half inch slices
Heat the oil in a pan for tempering.
Once hot add mustard seeds and sesame seeds. Let them splutter. Then add sliced muthia.
Mix gently so muthia do not break and cook it till you get little brown and crispy muthia. Turn off the heat. Serve hot!

Notes:
Any other grated vegetables like cabbage, bottle gourd /lauki, onions, methi leaves, spring onions, beetroot, carrots can also be added instead of spinach. Or you can make mixed vegetable muthiya.
If do not like tampering then even plain steamed muthiya tastes good.
I used corn meal/makki ka atta but that can be opted out. Use more besan instead of that.

Serving ideas:
It is a great tiffin and picnic snack.
Serve hot with chutney, curd or pickle.

Taste:
Spicy, soft and healthy.

Thursday, April 18, 2013

Bell Pepper Noodles, With Desi Tadka


I simply love noodles. Oh ya! I can live on noodles. Any noodles thin, flat or round is completely okay with me. Well one can make it healthy too, simply adds lots and lots of vegetables and the wholesome meal is ready. 

I have cooked schezwan noodles and egg noodles before (I told you I love noodles :-))This time is added only green capsicum and I was happy with the taste. Capsicum provides that crunch and mild sweetness to spicy noodles. I also wanted to give some desi tadka, so I opted to make them in south Indian style with some curry leaves and urad daal. Yup I was right it did tasted yummy and my experiment was successful.

Ingredients:
3 cups thin noodles
6 cups water
2 green capsicums/bell peppers/shimla mirch sliced
1 medium sized onion sliced finely
2 green chillies chopped finely
1/2 tsp mustard seeds/rai/sarso
2 tbsp oil
Red chilli powder-1 tbsp
Tomato ketchup- 2 tbsp
Salt as required
Urad Daal-1 tsp
Curry Leaves 4-5(I skipped this)

Method:
I used thin noodles so I broke them in to small pieces, so that resembles like seviya.
Boil water with some salt and oil. When water comes to boil, add noodles and boil.
Heat oil in the pan, add mustard seeds, urad daal, curry leaves. After it splutters add onion, green chillies and suate well.
Now add the capsicum pieces and cook till capsicum is half done.
Then add noodles, salt, red chilli powder and tomato ketchup. Cook covered for 2 minutes.

Notes:
Any other vegetables like pea, sweet corn, carrots, and tomatoes can also be added.
Add peanuts and coconut for more authentic south Indian taste.

Taste:
Hot and spicy with hint of sweetness.


Wednesday, April 17, 2013

Chocolate Ladoos In Microwave, Easy and Quick


Navratri has already started and I dint even made any sweet dish. No no it is not that I am fasting it is just that how can there be any festival in Indian culture without any sweets. I wanted to make something which is fast and also has minimum ingredients. Most of the sweets that we make in the festive time are either deep fried or needs lot of preparation. Thus to avoid all that and planned to make something sweet in microwave.

By the way have you checked my microwaved churma and modaks?? Microwave is just a great invention and if used wisely it saves lot of time and energy. I use microwave in lot of my dishes, I just love the way any sabzi or rice gets cooked evenly in single pot. I made tomoto and onion sabzi which was quite a hit on my blog. Do check what all I have cooked in microwave here.

Ok! Let me come back to my sweet dish. I made some chocolate ladoos using milk powder and condensed milk. The ladoos get prepared in just 3 minutes (you heard me right-just 3 minutes). I gave the flavour of ilyachi/cardamom because I feel that no Indian sweet dish is complete without the desi tadka of ilyachi’s flavour.


Ingredients:
1 cup milk powder
½ cup condensed milk
2 tbsp cocoa powder
4 tbsp ghee or butter
1 tsp  ilaychi/cardamom powder

Method:
Take a microwave safe glass bowl and melt ghee in it for 20 seconds.
Once ghee is melted add all the remaining ingredients and mix well.
Let it cook in the microwave for 3 minutes. Stir the mixture after every 1 minute.
Form ladoos once the mixture cools down and you are able to handle the heat in your hands.

Notes:
Do not let mixture cool down completetly otherwise you will not be able to form ladoos.
It is very important that you stir after every 1 minute.

Variations:
Try making simple mava ladoos by omitting cocoa powder.
Add very finely chopped nuts in the mixture to give crunchy effect.
Vanilla essence can also be added instead of cardamom powder.

Taste:
Sweet, chocolaty and soft


Tuesday, April 16, 2013

Tuesday's Tip- How To Store Green Chutney, Frozen Cubes

I am back with another Tuesday’s tip. This tip is so very useful especially for chutney lovers. As you all know that Mr. Husband and I are huge fans of chutney and we want it with almost all our meals. Green mint coriander chutney is my favourite and can be accompanied with mix vegetable paratha, Aloo paratha, rice, lauki theplas, pinwheel sandwiches ..oh! the list is endless. If you have green chutney ready in the fridge it saves most of your time.

I find it very time consuming to clean and pick the coriander and mint leaves and then make chutney out of it.  I thus came out with an interesting way to store and preserve green chutney for at least 1-2 months. I, now make a huge batch of chutney with 3-4 bunches of coriander and mint leave, and conserve them in my special way.


I made mint coriander chutney with some lime juice and hing (asafoetida) but chilli mint chutney and amla coriander chutney can also be frozen and preserved. There is no extra cooking in this method. You simply need to make chutney like you always do and freeze them in ice trays. Once they are frozen simply empty the cubes of chutney in Ziploc bags and freeze again. Any time you need chutney, take some frozen cubes and microwave for 20 seconds- and tadaaaa your chutney is ready to use.


Aren't they beautiful? Hope you enjoyed today's tip. See you with another tip next tuesday.

Friday, April 12, 2013

Chocolate Cookies With Whittard Of Chelsea Caramel Hot Chocolate


The mood of a person depends on many factors, but my mood changes when weather changes. Oh yes!! it is again raining here in London. I know from past few weeks I am complaining about the weather but trust me it is really pathetic. When it rains the perfect way to freshen up is to have a cup of hot chocolate.

Last time I tried my hands on Whittard Of Chealsea's Chilli Hot Chocolate and I was so very pleased with the taste. By the way let me tell you, Whittard Of Chelasea has been around since 1886 and known for its teas, coffees and hot chocolate. They posses huge list of flavours and taste as per your requirements. And those of you who wants to possess the mind blowing china crockery then this is the place. Do visit their site- www.whittard.co.uk and www.whittard.com .


I tried Caramel Hot Chocolate this time; as soon as I opened the box there was beautiful aroma of caramel. I couldn't wait any longer and made for myself a warm cup from it. At the very first sip, it I felt it was the "dessert in the cup" Some one has rightly said- Flowers and champagne may set the stage, but it's chocolate that steals the show :-)  After the blissful cup of hot chocolate, I planned to make some chocolate caramel cookies with it and it was the cherry on the cake. See the recipe below.

Ingredients: (Makes 18-20)
1 1/2 cups all purpose flour/maida
1/2 tsp baking soda
1/4 tsp salt
2 tbsp witthard of chelsea caramel hot chocolate
3/4 cup granulated sugar
1/2 cup vegetable oil

1 large egg

1 teaspoon honey


Method:
Preheat oven to 350 F/180 C. 
Sift together flour, baking soda, salt and cocoa powder then set aside. 
In a separate bowl, mix sugar, oil, egg and honey. 
Add in flour mixture to oil mixture a little at a time until well incorporated.
Scoop dough and roll it into a ball between your hands. Place on cookie sheet and slightly flatten with your fingers. 
Bake on an greased baking sheet for 8-10 minutes or until done.

Notes:
Use cocoa powder instead of caramel hot chocolate powder.
Butter can also be added instead of oil.
Try folding in some nuts or chocolate chips for extra crunch.

Serving Ideas:
Serve with hot chocolate, milk or tea.

Taste:
Chocolatey and crunchy

Disclaimer: I was not paid or told to write positive review. The post is based on my experience and is unbiased.  With thanks to Whiitard Of Chelsea for the review samples. 

Wednesday, April 10, 2013

Oven Roasted Okra/Bhindi- Crispy And Easy


I love bhindi, it is my brother’s favorite too. But I can’t cook bhindi or ladyfingers well. Every time I make bhindi it would either turn very gooey or it burns. I just cannot understand the science or art behind cooking the perfect bhindi. I have tried so many methods and variations but I fail each time.

After coming to London I tried my hands on frozen bhindi; by the way here bhindi is called as Okra. The experience with frozen okra was more terrifying. They turned mushy more like bharta. I almost gave up until one day I saw a video about making okra in the oven by Rashmi’s Recipes  I made some changes in the recipe as per my taste and requirements.

Finally, I collected all my strength and tried again, and this time I was happy and so was Mr. Husband :-). Let me tell you, cooking okra in oven is so easy and not at all messy. It needs no stirring and gets ready without any fuss. Oven roasted okra has right crispiness and amazing aroma. Do try it.

Recipe Source: Rashmi’s Recipes

Ingredients:
2 cups. Okra/ladyfinger/bhindi sliced (throw away the caps)
1 small onion/pyaz, sliced
2 tbsp. vegetable oil
1 tsp. crushed fennel/saunf seeds
Salt to taste
½ tsp crushed chilli flakes
2 tbsp coriender/dhaniya powder
1 tsp lemon juice

Method:
Heat oven to 200 C
Line an oven pan with baking paper/parchment paper.
Thoroughly mix all the ingredients in a bowl and set aside for 10-15 minutes.
Spread them in the pan and bake on medium rack for approximately 30 minutes. (Lower the heat if it starts to brown).
Once ready mix lime juice.


Notes:
Make sure that okra is nicely washed and drained. Water in okra will make it soggy.
Add 2-3 cloves of garlic for added flavour.
Peanuts and coconut can also be put in for south Indian style recipe.

Serving Ideas:
It is apt for take away lunch-pack in the tiffin of your husband or kids.
It is also a side dish, serve with rice or paratha..
Stuff between two bread slices and dish up as sandwich.

Taste:
Spicy, crisp and aromatic.

Tuesday, April 9, 2013

Tuesday's Tip- How To Store Green Chillies?


Today’s tip is very useful for all of us. Last Tuesday I shared how to handle the heat of chillies. Today I am going to share- How to store green chillies so that it lasts longer? I know we all pick a lot of chillies or just over-estimate what we need. And then comes the difficult task of making sure that they don’t spoil.

Every time I buy green chillies here in London, it reminds me-how back in India the sabjiwala used to gives us some dhaniya, karipatta and green chillies free as our token of loyalty for him. But here, there is no subjiwala and free things. I go to any Indian grocery store once in 3 weeks and buy all what I need in bulk. So either I would have to throw some chillies in the bin or they themselves spoil.

I have used frozen chillies as well, but they do not have that punch and spiciness like in fresh chillies. Anyways coming back to the tip; it is super easy and can be done at any kitchen. The stem of the green chillies are prone to bacteria and thus it leads to spoilage. So next time you bring green chillies simply discard the stem away. Then, if you find any rotten chillies in the bunch remove it off too because one rotten chilli can spoil the whole lot (remember the old saying about apple, only here it is chilli :) ). Next step is to wrap the chillies in the paper towel or newspaper and put them in Ziploc plastic and refrigerate it. Now wait and watch the magic; the green chillies will last longer (mine lasts up-to 4-5 weeks).

Hope you like the tip. Do use it and let me know the results. :-)

* Disclaimer :::: Not all the information mentioned above is my own and some of it are taken from various books and online sources like Google including the pics. My pics will have my logo on them , rest all are taken randomly from Google

Monday, April 8, 2013

Stuffed Tomatoes, Bharwa Tamatar: Aloo and Paneer Stuffed Tomatoes


As you all know that I am complaining about weather here in London from weeks. Well today I won’t, we had a beautiful sunny weekend this time (ah finally!!). Anyways do you remember I cooked onion shallots subji some months back and I called it as perfect rainy day subzi? Just like that I wanted to share one more recipe with you people which is hot and full of flavour and that is why it is ideal for the days when it is pouring.

I am talking about stuff tomatoes, which are getting poplar all over the world as starters. Tomatoes remind me of all those summer evenings at home when mom used to quarter them, sprinkle some salt and gave us a bowl each before dinner. Let me confess I do not like raw tomatoes. I need bread, cheese or some other veggie paired along to eat them. It was then when my mom used to stuff the tomatoes with paneer and aloo and I used to enjoy it. This way you increase the nutritional value too. Tomatoes are rich in Vitamin C and paneer gives you balance of proteins and calcium. You can put any kind of stuffing – this is my Indian way of doing it.


Ingredients:
6 medium size, firm tomatoes
1 tbsp Olive Oil
For stuffing
3 medium size potatoes/aloo, boiled
1/4 cup crumbles paneer
1 tbsp ginger-garlic/adrak -lehsun paste
2 green chillies, chopped
1/2 cup onion/pyaz, finely chopped
1/4 tsp garam masala
1 /2 tsp dry mango powder/ amchoor
1/2 tsp turmeric powder/haldi
1/2 tsp cumin seeds/jeera
Red chilli powder/lal mirch to taste
Salt to taste
Fennel seeds/saunf-2 tbsp
3 tbsp olive oil


Method:-
Preparing the tomatoes:-
Wash the tomatoes, pat them dry and using a sharp knife cut off  a about 1″ thick slice on top of the tomatoes. Reserve the tops. Run a sharp knife all around the edge of the tomatoes and scoop, take out the seeds and pulp.
Using a paper towel pat dry the inside of the tomatoes and rub those with seasoned olive oil inside and outside. Set aside in the fridge for 15 minutes.
Preparing the stuffing :-
In any heavy bottomed utensil, heat the oil on medium and add cumin seeds and green chillies to it, fry for 30 seconds. Add the ginger garlic paste and cook for 1 minute. Add the chopped onions next and cook until they turn golden brown.
Reduce the heat to low and add the turmeric powder .Cook for 2 minutes, taking care not to burn the spices.
Turn the heat high and add the mashed potatoes and paneer-combine everything.
Add salt, and red chilli powder. Cook for 5-8 minutes, stirring occasionally. The mixture should be ready when you can smell the aroma.
Remove from heat and add garam masala and amchoor .Let the stuffing cool down.
Stuffing the tomatoes:-
Make balls out of the potatoes mixture and fill it into the refrigerated tomatoes. Press down carefully. Cover with tomato chopped top and insert in a toothpick. Repeat the same step till all tomatoes are stuffed.
Heat a pan and add 1 tsp oil to it. Add saunf to the oil and let it splutter.
Transfer the stuffed tomatoes to the pan and stir carefully so that saunf is coated everywhere.
Mix in the pulp of the tomatoes and add some water (5 tbsp) and cook it covered till tomatoes are soft to touch. Keep a watch on them because they turn soft very easily. Serve warm.


Notes:
Instead of making on gas stove, you can bake the tomatoes on 190C for 12 minutes.
Any stuffing like cheese, corn, and peas can be used to stuff tomatoes.

Serving ideas:
They can be perfect appetizers and starters. Just serve them with sliced and toasted bread.
It is also a side dish, serve with rice or paratha.

Friday, April 5, 2013

Vanilla Marble Loaf Cake, Soft And Beautiful


Most of my fellow bloggers in the UK are complaining about the weather. Well I am also one among them, I mean common it is April and it is still snowing here. Any ways the only good way to cheer up the mood in these chill days is to bake something sweet.

I love the smell of the bakes especially with a of touch vanilla. Every time I think of vanilla one cake that pops in my mind is good old Victoria Sponge Cake. I have made eggless vanilla cup cakes before, this time I wanted to try vanilla loaf cake without butter. I always planned to make one but every time I did something new to it, thus forgetting about the plain loaf. Yeah! This time too I did the same thing, I added my favorite silver spoon blue colour to bring the marble effect.  Silver Spoon has some great range in the colors and I find them best among all the food colors. The overall taste and look of the cake was amazing. I added very little blue color and I was satisfied with the outcome. Coming back to the recipe.


Ingredients:
All purpose flour- 11/4 cup
Egg - 2
Oil-1/4 cup
Sugar-3/4 cup
Milk -1/4 cup
Vanilla extract-1 tbsp
Baking powder -1/2 tbsp

Method:-
  1. Preheat the oven to 350 F/ 180 C
  2. In a bowl beat the eggs well. Add sugar and beat well until it dissolves.
  3. Now add oil, milk and beat well.
  4. In a bowl sieve all purpose flour and baking powder.
  5. Gradually add egg mixture to the flour and mix well. Finally add vanilla extract and mix well.
  6. Grease the loaf pan with oil / butter and pour the 3/4th mixture to the pan.
  7. To the remaining 1/4th mixture, mix the silver spoon blue colour .
  8. Put the colour mixture on the 3/4th mixture such that it gives marble effect. Take a tooth pick and try to bring more marble effect by over lapping vanilla mixture to coloured one.
  9. Bake it for 50 - 55 minutes or till the tooth pick come out as clean.(Mine took 55 minutes).


Notes:
If you do not want marble effect, simply put the complete batter in the pan to bake.
Any kind of nuts can also be added to the batter to make nutty vanilla cake.

Serving Ideas:
Cut of the slice and heat in microwave for 20 seconds. Serve hot with ice cream.
Enjoy it with nutella, jam or butter.
Each slice can also be made to use tiramisu trifle like here.

Taste:
Soft, spongy and  beautiful.

Disclaimer: I was not paid or told to write positive review. The post is based on my experience and is unbiased.  With thanks to Silver spoon for the review sample

Thursday, April 4, 2013

Lauki Theplas, Indian Flat Bread With Bottle Gourd


Theplas make me a bit nostalgic; it reminds me of long train journeys in India. Thepla is one food that most of the Indian families take with them when they are travelling to some long distance for one reason that they stay longer and do not spoil easily.

Theplas are very easy to cook and also has many adaptations. Theplas can be made with mixed vegetables, methi, carrot, beetroot and almost anything. One among the lot which is very common and healthy is Lockey thepla. Lauki also called as ghiya, dhudhi and bottle gourd is low in fat and cholesterol yet high in dietary fibre. It contains 96% water. It is excellent for light, low-cal diets, as well as for small children, people with digestive problems, diabetics and convalescents. You can use lauki to make so many things. I made lauki kofta curry and not to forget lauki muffins. It is such a versatile vegetable and also high in nutrition.


If you have never made theplas before you might need to judge your dough very well. The dough should be soft but not very soft too. You also need to keep an eye on the amount of water you take to knead the dough. Lauki itself has lot of water and thus little sprinkles of water will be fine (nothing more than that). Moving to the recipe.


Ingredients
3 cups wheat flour (atta)
2 tablespoons vegetable oil
According to taste, salt
1/2 teaspoon turmeric powder (haldi)
1/2 teaspoon ajwain (carom) seeds
1 teaspoon white sesame seeds (til)
6 green chilis, or according to taste, ground into a paste
1/2 teaspoon ginger paste (adrak)
1/2 teaspoon garlic paste (lehsuni)
1 cup grated lauki (bottle gourd)
3 tablespoons yogurt (dahi)
1/4 cup or more, chopped cilantro/dhaniya
A small bowl of water

Method
Place all ingredients except the water in a large bowl. Knead for about 1 minute. Sprinkle a little water and knead till dough is no longer sticky and has formed a soft ball. (Remember: You may need to use a little more or less water depending on how ‘watery’ your lauki or bottle gourd is).
Set the dough aside for 10 minutes. Then roll out 20 pedas or ball from them.
Place a ball of dough on a flat surface. Using a rolling pin, roll it out like you would a chapati. Sprinkle flour on the thepla as when needed so it doesn't stick.
Heat a heavy skillet, griddle or tava. Place the rolled out thepla on it. Cook till brown spots appear on one side. Turn the thepla over, pour 1/4 teaspoon oil around it and let it cook till golden on both sides.
Repeat for all the dough.

Notes:
Use any other grated vegetable like carrot, beetroot, radish, methi leaves to make other flavours of thepla.
You can omit the use oil, simply use a napkin to roast the thepla. Remember no use of oil will not make the theplas last longer.

Serving Ideas:
There are so many ways to serve it with.. It can be eaten plain or serve with chutney, raita, any side dish or  pickle. This is perfect for breakfast; in fact for any time meal.

Tatse:
Spicy, soft and healthy