Showing posts with label main course. Show all posts

Thursday, July 30, 2020

Paneer Butter Masala | Restaurent and Dhaba Style | Tips To Make Perfect Creamy Gravy


I just happened to make this, because I wanted to use an open tub of fresh cream. Yes Paneer Butter Massala cannot be made without cream. If you want authentic real restaurant style gravy I will say please don’t skip cream.

How Paneer Butter Masala does taste like?

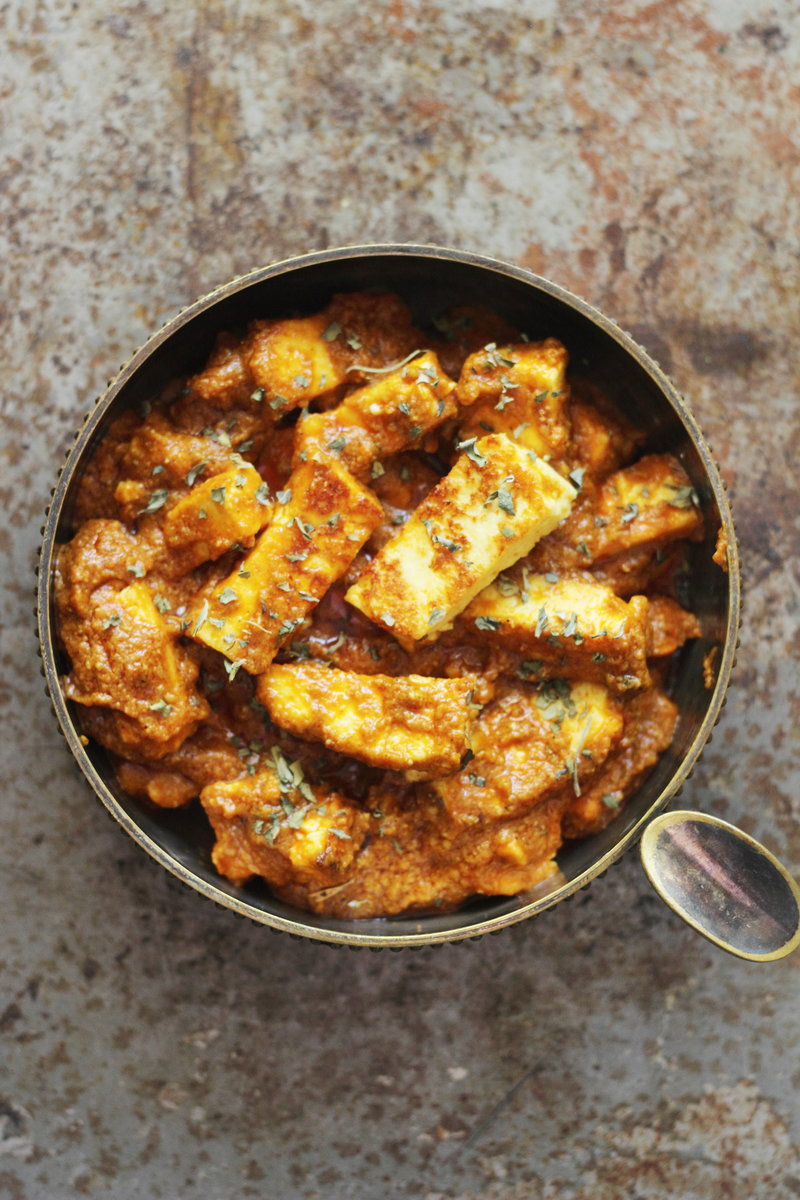
Very lightly spiced, tomato based gravy; thickened with cashews, cream and butter (ofcourse!). It is an indulgent dish, something in which you shouldn’t count calories or fat. For same reason it is also called as Paneer Makhani or Makhani Vale Paneer.

How to make restaurant style Paneer Butter Massala at home?

Yes, it is very easy to make restaurant style Paneer Butter Massala at home if you keep in mind the following tips.

-Do not overboard the gravy with spices and masalas. It has to be subtle. So if you use kitchen king masala power or any other spice powders, then stop it.

-Use nuts to thicken the gravy. Cashews are the best choice. You can use almonds too, but in that case soak the almonds and remove the skin. Again, do not go crazy with nuts too; you do not want super thick gravy.

-Put the paneer in the hot water and let it sit there for 20 minutes. This will soften the paneer and you will have that melt in mouth paneer cubes.

-Use butter and cream (full fat). There is no alternative for these too if you want good true paneer butter massala.

-To get that beautiful colour, use Kashmiri red chilli powder.

-Lastly use garlic, onion and tomatoes also in limited quantity. You do not want any of this to overpower the whole gravy.


How to make Dhabha style Paneer Butter Massala at home?

Okay, so those of you don’t know, dabha is a roadside restaurant in India. You will see so many dabhas on the highways, serving local cuisine. They are most commonly found next to petrol stations, and most are open 24 hours a day.

To make dabha style paneer butter masala you need to apply dhungar method or coal method. Here basically you heat up a piece of a coal till its red hot. Then place this charcoal in a steel bowl and place the bowl on the top of the paneer gravy. Add around ½ teaspoon of ghee on the coal and you will see smoke or fumes coming out it, immediately cover the pan with the lid and let it sit there for 2 minutes. Then remove the bowl and discard the coal. This method will give you that smokey paneer effect you get in the dhabha.

Is Paneer Butter Masala Healthy?

No absolutely not. Unlike other paneer dishes such as palak paneer or mutter paneer this paneer dish is loaded with calories and fat. It is not everyday kind of a paneer subji either –it is a royal treat that you can have once in a while.


What are variations to Paneer Butter Masala?

Over the years, trying paneer butter Massala at various places in india, UK and many European countries I have learnt some variations and I would like to share that with you all.

You can add makhane (fox nuts) in the gravy and it tastes good with paneer.

I have seen restaurants even adding peas (matar) with paneer gravy and it was a good twist too.

But my most favourite combination has been chunks of bell peppers in the paneer makhani gravy and in my recipe I have added it. (Feel free not to, but I promise there is something so magical about this variation).


Let us move to recipe now.

Ingredients:

2 tablespoon oil

1 bay leaf/tej patta

2 green cardamom/elyachi

½ inch cinnamon stick/dalchini

5-6 cloves garlic/lehsun, roughly chopped

1 inch piece of ginger/adrak, roughly chopped

1 large onion/payaz, roughly chopped

3 large tomatoes/tamatar, roughly chopped

7-8 cashews/kaju

4 tablespoons butter

½ teaspoon kashmiri red chilli powder

½ teaspoon garam Massala

¼ teaspoon turmeric powder

½ teaspoon red chilli powder

¼ teaspoon black pepper powder

1 tablespoon coriander powder

1 teaspoon sugar

Salt to taste

¼ cup cream

Water as needed

250 grams paneer chopped

1 capsicum chopped into cubes

2 teaspoons kasturi methi

1 tablespoons coriander leaves, finely chopped.

Method:

Heat oil in a pan. Add bay leaf, green cardamom and cinnamon. Let it sit in oil for 20 seconds. Reduce the heat to slow.

Add in chopped garlic, ginger and onion. Sprinkle ¼ teaspoon salt and cover it with the lid. Cook till onions turn soft and there is no raw smell.

Add tomatoes, cashews and around ¼ cup of water. Cover and cook again till tomatoes release the oil and it becomes soft and mushy.

Let the tomato mixture cool down and then grind it into smooth paste.

Heat 2 tablespoons of butter. Throw the tomato mix in the butter. Add in it kashmiri red chilli powder, turmeric powder, coriander powder, red chilli powder, black pepper powder, garam masala and salt to taste. Mix it all well. Add ¼ cup water. Cover and cook again for 5 minutes till you gravy bubbling up and leaving oil on the sides.

After 5 minutes, slowly add in the cream and sugar. Mix and let it cook covered for 7-8 minutes. You must see shiny creamy gravy. Have a quick salt test to see if you need anything.

In the meantime on a separate pan, heat ½ teaspoon butter and sauté paneer cubes till you see some light golden colour on its skin (do not over roast the paneer). In the same pan also roast bell pepper (capsicum) till you see some cooked or burnt spots on its skin. Set both aside.

Throw in paneer and capsicum in the gravy. Add ¼ cup water. Let it simmer covered on slow heat for 5 minutes.

Finally add in kasturi methi and coriander leaves.

Serve with dollop of remaining butter on the top. And swirl of some fresh cream.


Wednesday, July 22, 2020

Naan | No Yeast | Instant Naan | Chilli Garlic Naan | Naan on Tawa/Pan | Stovetop Method


Naan Bread and I are sure there are tons of recipes of it all over the internet and it must very confusing to decide which one to use. Well, to be honest it all depends on what your needs are. To elaborate the statement; do you want Naan to be without yeast or maida (all purpose flour). OR you want the naan to be cooked in oven or stovetop (gas/hob). OR you don’t have much time and you want an instant naan recipe. OR you want a healthy version let’s say whole wheat (chakki atta) naan.

So as mentioned, there are so many variations of naan recipes from the ingredients used to the method of cooking. I have made all kinds of naan at home but never shared the recipe, because there are so many kinds of recipes already on the internet. For me it all started when I shared this post of Dal Makhani and Garlic Naan on Instagram and people started asking for the recipe.


This naan is made from scratch and is yeast free (so no yeast) but I used yogurt (dahi/curd) instead and is made using half and half of all purpose flour (maida/plain flour) and whole wheat flour (our chapatti ata like Pillsbury or ashirwad). I wanted to keep the dinner as fuss free as possible so I made it on the pan/tawa and then roasted it on stovetop to give that tandoor or restaurant kind smokey taste and flavour.


Just by using this simple and basic naan dough recipe you can make so many variations of naan. Use chopped garlic to make garlic naan. Or green chillies to make chilli naan. Or both chilli and garlic to make Garlic Chilli Naan. You just need to brush some butter on the hot naan and there you have Butter Naan. Sometimes I also like to use mint and coriander leaves to get that restaurant style feel. Since naan is so widely popular all over the world now, I have seen Italian twist also given to naan by adding pesto, fresh or dried Italian herbs such as oregano, basil and chilli flakes.

What to eat with naan? I would say any paneer dishes goes really well with naan. But you can also pair it up with hummus and yogurt dips. Or like me, I love naan with Dal Makhni (I honestly don’t feel there is any better combo then this one.)

You can see the making of the naan in this video below.


Ingredients:

1 cup All Purpose Flour

¼ cup whole wheat flour

¼ teaspoon baking soda

½ teaspoon sugar

Salt to taste

¼ cup Yogurt

A little less then ¼ cup water

1 tablespoon Oil

2 tablespoons Garlic chopped

1 tablespoon green chilli chopped

1 teaspoon mix of sesame seeds and onion seeds (kalonji and til)

Method:

In a mixing bowl mix; yogurt, salt, sugar, soda, whole wheat flour and all purpose flour. Mix all the dry ingredients well.

Add yogurt and start forming the dough. Start adding water little by little (you might not need to add all the water). The dough should be stretchy and soft. Cover and keep it aside for at least 30 minutes.

Heat a flat non-stick pan or skillet or tawa.

Divide the dough into 4 equal parts and roll it to ball shape of ball.

Start rolling the naan. Shape doesn’t matter; I rolled into oval cylindrical shape. Sprinkle onion seeds, sesame seeds, chopped garlic and green chilli on one side of the naan.

Place the naan with garlic side first on the tava. When you see the bubbles turn it over and cook the other side. Naan needs to be cooked on high heat. When the other side is also cooked properly; start roasting the naan on an open heat/flame on the stovetop. If you have gas burner then reduce the heat and cook the naan with the help of tong till you see brown spots. If you have induction or electric hob, then use a iron grill to roast the naan. (You must see the video above to understand what I mean).


Tips:

Rest the dough in the warm place. Do not put it in the fridge. The more you rest the better the naan will be.

For that authentic taste skip whole wheat flour and use only all purpose flour. 

Monday, June 22, 2020

Rajasthani Marwadi Gatte Ki Subji


Very proudly I can say that Marwadi recipes are the most popular ones in the blog. Why not, after all I am marwari and that too from Rajasthan and thus, I am good with authentic marwari cuisine. Today we are talking about very classic, simple and yet royal looking Gatte Ki Subji.

Gatte Ki Subji is another invention that happened because of necessity. The shortage of rains and water always made Rajasthanis think out of the box and thus they commenced using gram flour (besan) to make gatte and then use it the curry. Besan is also called as chickpea flour and is so widely used in Rajasthan that you can't even imagine.


If you go to a Marwadi house on a regular day then this sabzi is made in a very casual way without any garlic, onion or tomatoes. So yes, authentically this is a no veggie curry but if it is paired with Daal Baati or is made on a special day then, you will see slight rich variation where it is uplifted by garlic, onion and even tomatoes.

Originally from Rajasthan, this curry has also changed its taste as it traveled from one part of India to other. Now we see its dry variation (without gravy) , a sindhi variation wherein its very spicy and also a Gujarati  version which is sweet and sour. I will share the recipe that is made with garlic, onion, tomatoes and yogurt (dahi/curd). Also, I was once asked to share the recipes that is without curd. To be honest, yes you can make this curry without curd but what it will lack is that yellowish orange colour. To do so, just make a semi thick tomato gravy that you would do for any curry and then just dunk in the gatte.


How to make soft gatte for gatte ki sabji?

-Always add in a litter yogurt while kneading the dough for gatte.

-You will also need to add oil in the dough.

-Do not rest the dough. Keep the water for boil and then start making the dough so that you don't have to wait.

-The dough should be just right-not too soft and not too hard either.

-Spice up the dough too. The dough needs salt, red chilli powder, turmeric and fennel seeds (saunf). My mother will always say that fennel seeds is so important in gatte ki subzi.

-Lastly, boil the gatte till you see bubbles on its skin and it becomes light and start to float on the water.


Ingredients:

For gatte

1/2  cup chickpea flour/besan

4 tablespoons yogurt/dahi

¼ teaspoon turmeric powder

½ teaspoon fennel seeds/saunf crushed

red chili powder as per taste

salt to taste

1-2 teaspoon oil


For Curry:

3 tablespoons oil

1 teaspoon cumin seeds/jeera

1 bay leaf/tej patta

2-3 dry red chilli

1 medium onion, finely chopped

2-3 garlic cloves, grated

1 meduim tomato, finely chopped

3/4 cup whisked yogurt/dahi

1 tablespoon coriander powder/dhaniya powder

¼ teaspoon turmeric powder

Red chilli powder as per taste

1 teaspoon kasuri methi crushed

1/4 teaspoon garam massala

water as needed

salt to taste

1 teaspoon sugar

Method:

For Gatte

Start by putting water for boil in a pan.

Mix all the ingredients listed in the gatte list and make a soft dough. Add water as needed. The dough will start becoming sticky and thus it’s a good idea to oil your hands.

Divide the dough into 4 parts and shape it into logs.

Put these logs into boiling water and boil. It will take around 15-20 minutes. The gatte will become light and start to float on the water. You will also see bubbles on its skin. Boil till a knife inserted comes clean.

Take the gatte out of the water and cut into pieces.

Heat around 1 teaspoon of oil and fry the gatte.

For Gravy

Heat oil in pan. When oil gets hot add in cumin seeds, bay leaf and dry red chilli.

Add in garlic and onion and sauté till it gets cooked.

Add in chopped tomato and cover and cook till tomato becomes mushy and soft.

Mix salt, turmeric, red chili powder, sugar and coriander powder in the yogurt and mix well.

Add the yogurt mixture in the tomato paste and keep mixing till it comes to a boil.

Add water and let it boil for some time, around 5 minutes. I used around 1 and 1/2 cups water.

Add in the gatte and garam massala and boil again for 10 minutes. You might need to add in more water because gatte will thicken the gravy. So I added 1/2 cup of water again.

Garnish with kasturi methi and serve.


More Marwari Recipes you might be interested in:

Papad Ki Subji

Lehsun Ki Chutney 

Mangodi Matar

Sev Tamatar


Friday, May 8, 2020

Dry Paneer Bhurji |Without Tomatoes|For Weight Loss|


Paneer as you know is the crowd pleaser ingredient for vegetarians. There are so many ways and recipes in which you can use paneer -right from starters to sides, to even desserts. Some of the paneer dishes doesn't even need any introduction such paneer dishes are either cooked at home or eaten at a dhabha as Mutter Paneer, Paneer ButterMassala and Palak Paneer.

Then are some paneer dishes that you always eat at a restaurant such as Kadai Paneer, Achaari Paneer, Paneer Tikka Massala and Paneer Kofta. Today I shall talk about Paneer Bhurji. What is Paneer Bhurji? Paneer Bhurji is a popular north Indian dish made with cottage cheese, with spices (massala) and with or without veggies. It is eaten with roti, paratha, naan, puri, kulcha, bhatura, bread, pav or as a side dish. It is also used as a stuffing for sandwiches, kathi roll, frankies, pitta bread, paratha and bread rolls.


Is paneer healthy? Can we eat paneer every day? Is paneer good for weight loss? After a quick google search and speaking to a friend who is a dietician and a nutritionist  I have come up to the conclusion that paneer is a power house of protein, healthy fats and is very low on carbohydrates. It is recommended for weight loss only if you make it in a healthy way that is not by deep frying and also using lots of vegetables in the process.

When I initially started cooking paneer bhurji, I saw so many recipes and videos of Sanjeev Kapoor, Ranveer Brar, Harpal Singh etc but slowly I understood that you need to decide as an individual what you want in your paneer bhurji. Paneer Bhurji is one such paneer dish that is super healthy and can be altered in so many ways. You can use onions garlic or not. You can use capsicum (I love to use) or not. Some people like it with gravy, I just prefer it dry. You can add veggies like corn, peas, spinach etc to make it even healthier.


You can put together fresh paneer from scratch for this recipe, I like to use store brought ones. In the market you will find two types of paneer-one will be soft white paneer and other will be slight yellowish paneer (bit hard, that looks like a block of cheddar cheese) -use that hard one for paneer bhurji recipe. Reason, because hard paneer is easy to grate and when it cooks it doesn't become a mushy mess. Also if you are using frozen paneer, give a good boil in the pan full of water, when it cools down-grate and use.

I use very basic daily spices and powders to make this. Also I don't like to use tomatoes as well. so Let's see how to make paneer burji.

Ingredients:
1 cup grated paneer
1 medium sized onion chopped
2 cloves of garlic grated
1/2 capsicum chopped
1 green chilli chopped
1 tablespoon lemon juice
2 tablespoons oil                      
1 teaspoon cumin seeds
1/2 teaspoon kasturi methi
1/4 teaspoon hing
1/2 teaspoon turmeric powder
1 tablespoon coriander powder
1/4 teaspoon garam massala
Red chilli powder as per taste
Salt as per taste
Coriander leaves for garnish
1/4 cup water

Method:
Heat oil in a pan, when it is hot add in hing and cumin seeds. Let it splutter.
On a slow heat add in garlic and onion. Cook till there is now raw smell and onions become soft.
Add in capsicum and cook it till it turns soft.
Add in grated paneer. Mix in all the spices-salt, red chilli powder, coriander powder and turmeric powder. Also throw in green chilli. Mix well.
Add in water and lemon juice. Cover and cook for 5 minutes. After 5 minutes and mix in kasturi methi and garam massala. Mix and let it cook for another 2 minutes.
Garnish with coriander leaves and serve.


Notes:
If you want to have gravy, after onions, garlic and capsicum is cooked add in 2 chopped tomatoes. When tomatoes are done follow the remaining steps and paneer bhurji with gravy will be ready.
Some recipes call for pav bhaji or kitchen king massala, I just feel that these massala over powers the actual taste so I avoid using it. Feel free to add if you wish.
You can make stuffed parathas with this bhurji and also use it as stuffing for sandwiches and rolls.

Wednesday, November 8, 2017

Achari Paneer


Achari recipes are becoming very popular these days. Almost every Indian restaurant will have some achari dishes in the menu. Honestly it is a great way to bring twist to plain old simple recipes. Achari taste is robust of flavours. Easy but would give an impression that you have taken lot of efforts.

Achari or pickled spices are the mix of mustard seeds (rai), fenugreek seeds (methi), nigella  seeds (kalonji) and fennel seeds (saunf). These spices are not hot or spicy infact they are bitter in taste and have very strong aroma. You need to dry roast these spices and then use it, this then helps to give curry a very unique and piquant taste. I like to grind the roasted spices into fine powder, but you can use whole or coarse powder as well. 

Today I have made Achari Paneer, it is a dry (suki) vegetarian side dish with indian breads such as puri, paratha or chapati and goes well with rice and daal as well. Don’t let ingredients list intermediate you, this curry is indeed easy and worth all the steps.


More Achari Recipes:-


How to make Achari Paneer

Ingredients:
(For Achari Massala)
1 whole red chilli
1/2 teaspoon mustard seeds/rai
1/2 teaspoon fenugreek seeds/methi dana
1/2 teaspoon fennel seeds/saunf
1/2 teaspoon nigela seeds/kalonji
1/2 teaspoon cumin seeds/jeera
(For Gravy)
1 ½ cups paneer
1 onion medium size chopped finely
1 tablespoon ginger garlic paste
3 tablespoons yogurt/dahi
2 tomatoes
1 teaspoon red chilli powder (adjust as per taste)
1/2 teaspoon turmeric powder/haldi
1/2 teaspoon coriander powder/dhaniya
2 tablespoons oil + 1 tablespoon
Salt to taste
Coriander leaves to garnish
Kasturi Methi to garnish (optional)


Method:
Take all the ingredients listed in Achari spices and dry roast in the pan on very slow flame/heat. Let it cool down and grind into fine-corase powder.
Heat 1 tablespoon oil in a pan. Add the paneer and fry it. Make sure that paneer turns golden on all sides. Set the paneer aside.
Heat the remaining oil. Add ginger garlic paste. Sauté for one minute.
Add chopped onions. Saute for one minute or till onions are cooked properly.
Add chopped tomatoes. Throw in salt, turmeric, coriander powder and red chilli powder. Cover and cook till massala is cooked and tomatoes turned soft.
Take yogurt in a separate bowl. Mix in Achari massala. Whisk properly.
Slowly mix the yogurt mix into tomatoes gravy. Stir continuously for 1 minute.
Throw in paneer. Mix. Cover and cook till massla is well coated on paneer.

Garnish with kasthuri methi and coriander leaves.


Thursday, October 12, 2017

Urad Dal Kachori: UP Vali Kachori: Aloo Ki Subji And Kachori


Aloo Ki Subji will be one dish that is popular in every household of India. However every state has got its own way of cooking it and serving it with. It’s served humbly with paratha or roti; served as a side with rice and dal. It is also paired with puri and batura, but the most royal match is when it is dished up with Kachori.

Those of you dont know, Aloo Ki Subji and Kachori combination is very popular in UP (Uttar Pradesh). From Ganga ghats in Banaras to Krishna’s home in Mathura to temples in Rishikesh and Haridwar this meal has stolen many hearts. It is a wholesome vegetarian meal, mostly served as breakfast or brunch near the temples and pooja places as a street food.

The simplicity and filling attributes make this dish very popular. Spicy and yet modest aloo ki subji is served with Urad Daal Stuffed Kachori. What makes it filling and perfect for breakfast are two things. a)Urad daal is heavy to digest, so you feel full very quickly. b) The kachori is made with maida (all purpose flour) and is deep fried. These two features make it so perfect for brunch as well.


What is kachori? Kachori is like puri but stuffed. The kachori we are talking here is different from Rajasthani Kachori also called as club kachori. Kachori in rajasthan are smaller and puffed up-served with chutney or as a chaat with dahi (yogurt) and meethi chutney. However these UP vali kachori are flat kachoris and are stuffed with urad dal instead of moong dal.

Aloo ki subji is also called as Mathura Ke Dubki Vale Aloo, Haridwar Ke Rassewale Aloo, Banerasi/Benarsi Aloo. Same way the kachori is called as Khasta Kachori, Kasta Bedvi Kachori.

Ingredients:
For Dough
1 cup all purpose flour/maida
2 tablespoons semolina/suji
Salt to taste
1/2 teaspoon baking soda
4 tablespoons oil
Water as needed
More oil for frying
For Stuffing
1 tablespoon oil
Pinch asafoetida/heeng
1/2 cup white lenthils/urad daal
1 green chilli chopped
1/4 teaspoon cumin seeds/jeera
1/4 teaspoon fennel seeds/saunf
1/4 teaspoon coriander seeds/sabut dhaniya
1 teaspoon grated ginger/adrak
1 tablespoons coriander leaves chopped
1/4 teaspoon garam massala powder
1/2 teaspoon coriander powder/dhaniya powder
1/4 teaspoon turmeric powder/haldi
1/4 teaspoon red chilli powder/lal mirchi
Salt to taste
1/4 teaspoon black salt/kala namak

Method:
For dough-
Mix all the ingredients listed under dough category. Mix slowly water and start to form smooth dough. Let it rest for 30 minutes.
For stuffing-
Soak the dal for atleast 3 hours in the water. Then drain the water, wash the dal and keep aside.
Grind the dal coarsely with saunf and coriander seeds.
Heat oil in a pan. Add in it jeera, heeng. Let it crackle. Mix in turmeric, red chilli powder, coriander powder, green chilli, adrak, garam massala and coriander powder. Mix for 10 seconds.
Mix this above massala mix in grinded dal. Mix well.
Mix in salt, black salt and coriander leaves.
Assembly-
Take a lemon sized ball of the dough, roll it out a bit. In the centre add in 2 teaspoon of stuffing. Take the edges of the rolled out dough and seal the edges.
With the roller pin (belan) flatten the stuffed ball.
Heat oil in wok, when hot, throw one kachori at a time. With the help of a spatula apply bit pressure and try to puff it. Flip and cook on the other side as well.
When you see it has become red. Serve.


Notes:
Feel free to use whole wheat flour/atta as well.
You can make moong (yellow mung) dal kachoris same way. Moong daal is bit lighter to digest.
Fry the kachori on mdeuim heat.

Monday, September 11, 2017

Achari Bhindi Pyaz:Okra In Pickle Spices


I have a funny story to share today. Now, back in India we always knew Bhindi is called as Lady Finger-that is what we were taught in schools-right? After coming to the UK, one day I asked a grocery vendor if he has got some lady fingers in his shop. He quickly went inside and got me a pack of finger cakes (also known as finger sponges, mainly used in tiramisu). I was shocked and embarrassed at the same time, I did not know how to react at all, and thus I purchased that cake pack :-). I came back home and quickly searched on internet-it was then I came to know that bindhi is actually known as Okra ;)

From simple stir fried okra subji to exotic Bhindi Do Pyaza you can do so much with this humble vegetable. I have made oven roasted Bhindi also and if you fancy something marwadi then check Bharwa (stuffed) Bhindi recipe. Today, I gave okra a pickled taste.


Achari Bhindi Pyaz is robust of flavours. Easy but would give an impression that you have taken lot of efforts. Achari massala is dry roasted spice powder made by grinding the spices that are used in making pickle. Then, you need to use mustard oil (sarso ka tel) to bring that sour and authentic achari taste. I have seen people using yogurt (dahi/curd) in this recipe but I feel that it makes it very mushy and I personally don’t recommend it.

For me, Achari Bhindi Pyaz should be dry, coated with pickle massala and should have a bit of tanginess in the end. This is surely a crowd pleaser recipe.

Ingredients:
For Achari Massala
1/2 teaspoon fenurgreek seeds/methi dana
1/2 teaspoon fennel seeds/saunf
1/2 teaspoon coriander seeds/dhaniya
1/2 teaspoon onion seeds/kalonji
1/4 teaspoon mustard seeds/rai
For Subji
250 grams okra/Bhindi
2 onions/pyaz
1-2 green chillies
2 tablespoons mustard oil/sarso tel
Salt to taste
1/4 teaspoon turmeric/haldi
1/2 teaspoon coriander powder/dhaniya powder
1/4 teaspoon red chilli powder/lal mirchi
1/2 teaspoon dry mango powder/amchur


Method:
For Achari Massala
On a low flame dry roast the ingredients till you smell good aroma. Approximately it takes 5-8 minutes.
For Subji
Chop Bhindi and pyaz lengthwise.
Heat oil in a kadai. When oil gets hot, add bhindi and pyaz.
Reduce the heat to low. Mix in salt and turmeric. Cover and let it cook for 8-10 minutes or till bhindi is half done.
Add in 1/2 teaspoon achari massala, coriander powder, red chilli powder and green chillies. Cover and cook again for 5 minutes.
Add in amchur powder. Mix. Cover and turn off the flame/heat.
Serve.


Notes:
Recently when my parents visited us my mother got me homemade achari massala and I used the same in this recipe. If you want a quick fix then I highly recommend using MDH Achari Massla which is easily available in Indian grocery stores.
Feel free to use some other oil as well, but mustard oil does bring the authentic pickle taste.
Make sure that okras are washed and dried well before using.