Showing posts with label main. Show all posts

Wednesday, July 22, 2020

Naan | No Yeast | Instant Naan | Chilli Garlic Naan | Naan on Tawa/Pan | Stovetop Method


Naan Bread and I are sure there are tons of recipes of it all over the internet and it must very confusing to decide which one to use. Well, to be honest it all depends on what your needs are. To elaborate the statement; do you want Naan to be without yeast or maida (all purpose flour). OR you want the naan to be cooked in oven or stovetop (gas/hob). OR you don’t have much time and you want an instant naan recipe. OR you want a healthy version let’s say whole wheat (chakki atta) naan.

So as mentioned, there are so many variations of naan recipes from the ingredients used to the method of cooking. I have made all kinds of naan at home but never shared the recipe, because there are so many kinds of recipes already on the internet. For me it all started when I shared this post of Dal Makhani and Garlic Naan on Instagram and people started asking for the recipe.


This naan is made from scratch and is yeast free (so no yeast) but I used yogurt (dahi/curd) instead and is made using half and half of all purpose flour (maida/plain flour) and whole wheat flour (our chapatti ata like Pillsbury or ashirwad). I wanted to keep the dinner as fuss free as possible so I made it on the pan/tawa and then roasted it on stovetop to give that tandoor or restaurant kind smokey taste and flavour.


Just by using this simple and basic naan dough recipe you can make so many variations of naan. Use chopped garlic to make garlic naan. Or green chillies to make chilli naan. Or both chilli and garlic to make Garlic Chilli Naan. You just need to brush some butter on the hot naan and there you have Butter Naan. Sometimes I also like to use mint and coriander leaves to get that restaurant style feel. Since naan is so widely popular all over the world now, I have seen Italian twist also given to naan by adding pesto, fresh or dried Italian herbs such as oregano, basil and chilli flakes.

What to eat with naan? I would say any paneer dishes goes really well with naan. But you can also pair it up with hummus and yogurt dips. Or like me, I love naan with Dal Makhni (I honestly don’t feel there is any better combo then this one.)

You can see the making of the naan in this video below.


Ingredients:

1 cup All Purpose Flour

¼ cup whole wheat flour

¼ teaspoon baking soda

½ teaspoon sugar

Salt to taste

¼ cup Yogurt

A little less then ¼ cup water

1 tablespoon Oil

2 tablespoons Garlic chopped

1 tablespoon green chilli chopped

1 teaspoon mix of sesame seeds and onion seeds (kalonji and til)

Method:

In a mixing bowl mix; yogurt, salt, sugar, soda, whole wheat flour and all purpose flour. Mix all the dry ingredients well.

Add yogurt and start forming the dough. Start adding water little by little (you might not need to add all the water). The dough should be stretchy and soft. Cover and keep it aside for at least 30 minutes.

Heat a flat non-stick pan or skillet or tawa.

Divide the dough into 4 equal parts and roll it to ball shape of ball.

Start rolling the naan. Shape doesn’t matter; I rolled into oval cylindrical shape. Sprinkle onion seeds, sesame seeds, chopped garlic and green chilli on one side of the naan.

Place the naan with garlic side first on the tava. When you see the bubbles turn it over and cook the other side. Naan needs to be cooked on high heat. When the other side is also cooked properly; start roasting the naan on an open heat/flame on the stovetop. If you have gas burner then reduce the heat and cook the naan with the help of tong till you see brown spots. If you have induction or electric hob, then use a iron grill to roast the naan. (You must see the video above to understand what I mean).


Tips:

Rest the dough in the warm place. Do not put it in the fridge. The more you rest the better the naan will be.

For that authentic taste skip whole wheat flour and use only all purpose flour. 

Thursday, November 16, 2017

Tiffin Wali Bhindi : Bhindi Massala: Okra Stir Fry


School time is the best time of our lives, ofcourse we realise that once we are in college. One of the fondest memories of school days-sharing tiffin boxes. We used to get 30 minutes recess and it was all about chit-chats and food. Tiffin box was always a surprise, and my mother made sure that every time it was a happy one.

We (my brother and myself) never got bread butter or jam butter in our tiffin box, it was always about paratha subji as mother believed that only paratha subji can suffice our hunger and give all the good energy for school. It was mostly plain paratha with any sukhi (dry) subji- aloo ki subji, pata gobi ki subji, gobi matar and beans subji.


Of all these options, I treasured and enjoyed most Bhindi Ki Subji, Okra Stir Fry and you can also call it as Massala Bhindhi. So the other day I was asking my mom over the phone about why Tiffin Wali Bhindi was so good and what special ingredient did she put in it? She replied-kuch bhi nahi (nothing). The simplicity of the subji makes it extraordinary. No onion, no ginger, no garlic, no garam massala- just 3 spices and get ready in jiffy.


This is tiffin wali subji, means it is ideal for packing it in your kids’ lunchbox or your husband’s tiffin. So, give makeover of dishes some rest and try this easy peasy full of flavours, good old style Tiffin Vali Bhindi a try.


Ingredients:
2 cups chopped okra/lady finger/bhindi
2 tablespoons oil
¼ teaspoon turmeric powder/haldi
½ teaspoon red chilli powder/lal mirchi
1teaspoon coriander powder/dhaniya
Salt to taste
1 tablespoon lemon juice

Method:
Heat oil in a kadai. When oil gets hot reduce the flame/heat to low.
Throw okra, turmeric powder and salt. Give a quick mix. Cover and cook till okra is half cooked.
Open the lid and add red chilli powder and coriander powder. Cover and cook again for 1 minute.
When okra is cooked completely mix in lime juice.
Serve.


Notes:
It is very important that you wash okra well. Make sure it is completely dry before you chop it and cook it. If the okra is not dry it will become mushy.
You can use amchur powder (dry mango powder) or dahi (yogurt/curd) instead of lemon juice.

Wednesday, November 8, 2017

Achari Paneer


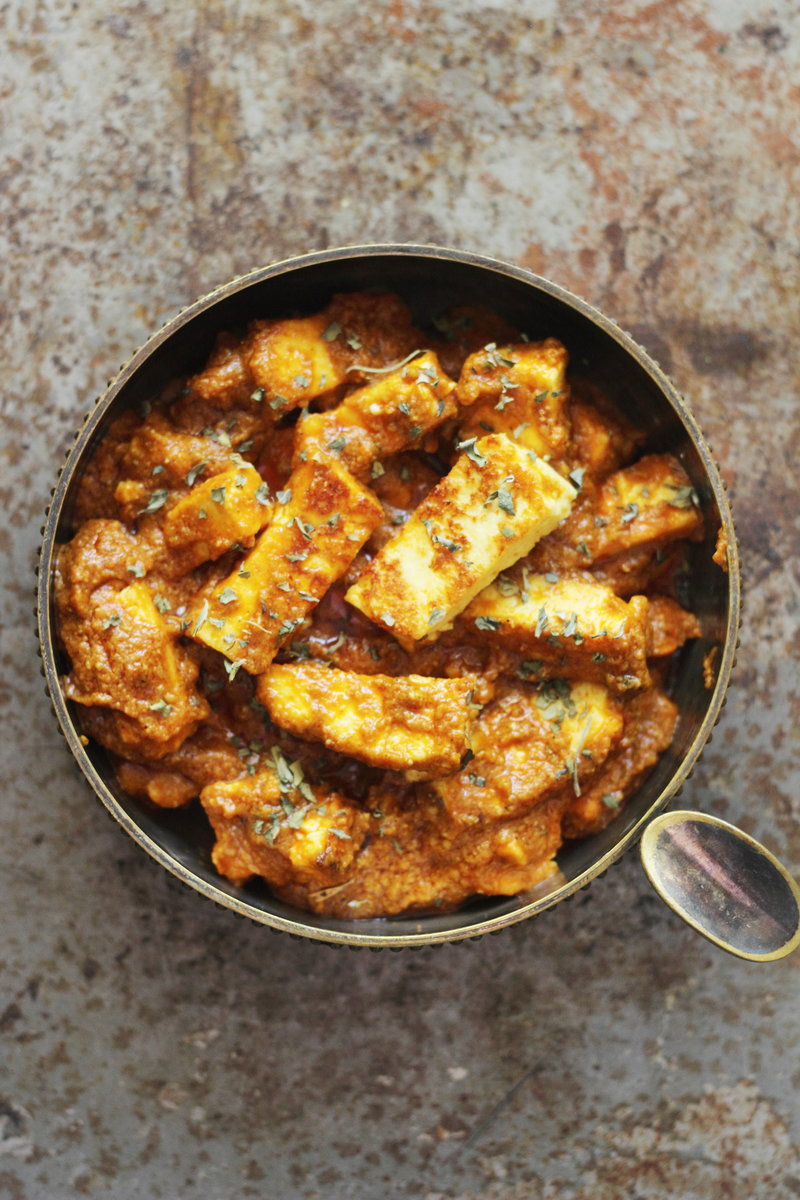
Achari recipes are becoming very popular these days. Almost every Indian restaurant will have some achari dishes in the menu. Honestly it is a great way to bring twist to plain old simple recipes. Achari taste is robust of flavours. Easy but would give an impression that you have taken lot of efforts.

Achari or pickled spices are the mix of mustard seeds (rai), fenugreek seeds (methi), nigella  seeds (kalonji) and fennel seeds (saunf). These spices are not hot or spicy infact they are bitter in taste and have very strong aroma. You need to dry roast these spices and then use it, this then helps to give curry a very unique and piquant taste. I like to grind the roasted spices into fine powder, but you can use whole or coarse powder as well. 

Today I have made Achari Paneer, it is a dry (suki) vegetarian side dish with indian breads such as puri, paratha or chapati and goes well with rice and daal as well. Don’t let ingredients list intermediate you, this curry is indeed easy and worth all the steps.


More Achari Recipes:-


How to make Achari Paneer

Ingredients:
(For Achari Massala)
1 whole red chilli
1/2 teaspoon mustard seeds/rai
1/2 teaspoon fenugreek seeds/methi dana
1/2 teaspoon fennel seeds/saunf
1/2 teaspoon nigela seeds/kalonji
1/2 teaspoon cumin seeds/jeera
(For Gravy)
1 ½ cups paneer
1 onion medium size chopped finely
1 tablespoon ginger garlic paste
3 tablespoons yogurt/dahi
2 tomatoes
1 teaspoon red chilli powder (adjust as per taste)
1/2 teaspoon turmeric powder/haldi
1/2 teaspoon coriander powder/dhaniya
2 tablespoons oil + 1 tablespoon
Salt to taste
Coriander leaves to garnish
Kasturi Methi to garnish (optional)


Method:
Take all the ingredients listed in Achari spices and dry roast in the pan on very slow flame/heat. Let it cool down and grind into fine-corase powder.
Heat 1 tablespoon oil in a pan. Add the paneer and fry it. Make sure that paneer turns golden on all sides. Set the paneer aside.
Heat the remaining oil. Add ginger garlic paste. Sauté for one minute.
Add chopped onions. Saute for one minute or till onions are cooked properly.
Add chopped tomatoes. Throw in salt, turmeric, coriander powder and red chilli powder. Cover and cook till massala is cooked and tomatoes turned soft.
Take yogurt in a separate bowl. Mix in Achari massala. Whisk properly.
Slowly mix the yogurt mix into tomatoes gravy. Stir continuously for 1 minute.
Throw in paneer. Mix. Cover and cook till massla is well coated on paneer.

Garnish with kasthuri methi and coriander leaves.


Wednesday, April 26, 2017

Aloo Lilva Subji: Tuver/Pegion Peas Potatoes Curry


Lilva, tuar, tuver,toovar, or lilva papadi whatever else you call it. Lilva is a type of beans commonly known Pigeon Peas. I would say it’s like green peas but flat like beans. If you just put lilva in Google, the top most recipe it will give you will be Lilva Kachori. Yes Lilva kachori is very famous and its native lies in Gujarat.

Today, I have another recipe, a simple one- Aloo Lilva Subji. Potatoes and Lilva curry. Just like aloo matar (peas and potatoes) this combination is also highly addictive. You can make this curry in pressure cooker just like pressure cooker aloo matar recipe (just replace peas to lilva). Today I am sharing a Gujarat way, restaurant style version.


Most of the thali in Gujarat will have this subji. It will be bit sweet, spicy and garlicy. So this is that version- rich tomato gravy with garlic, spices and jaggery. Serve it with plain chapati or phulka or paratha.

Ingredients:
2 medium size potatoes/aloo
1 cup pigeon peas/lilva
1 large tomato/Tamatar
4 cloves garlic/lehsun
2 tablespoon tamarind pulp/imli
1 tablespoons jaggery/gud
2 tablespoons oil
Pinch asafoetida/hing
1 bay leaf/tej patta
1 teaspoon cumin seeds/jeera
1/2 teaspoon turmeric powder/haldi
1 teaspoon red chilli powder/lal mirch
1 teaspoon coriander powder/dhaniya
1/2 teaspoon garam massala
1 teaspoon dried fenugreek leaves/Kasturi methi
Salt to taste

Method:
Boil potatoes in pressure cooker. Let it cool. Chop and keep aside.
Boil lilva and keep aside.
In a blender, blend tomatoes, garlic, garam massala, red chilli powder, turmeric and coriander powder.
Heat oil in a pan. Add heeng.
Add jeera and let it crackle. Add bay leaf.
Turn the flame/heat to low. Add blended tomato mixture. Cover and cook for 10 minutes. Cook till oil separates and starts to float over.
Add 1 cup water and salt. Throw in potatoes and lilva. Cover and cook again for 5 minutes.
Add in imli pulp and gud. Mix and cover again. Cook for 2 minutes.
Garnish with kasuri methi and serve.


Notes:
I used frozen lilva. You can use fresh if you get. In the UK we get frozen lilva easily, some popular brands are cofresh, shana, ashoka and taj.
You can use lemon juice instead of tamarind/imli paste.
Feel free to substitute jaggery/gud from sugar.

Wednesday, April 5, 2017

Sev Tameta Nu Shak –Gujarat Way


Rajasthan and Gujarat are two Indian states located in western India sharing borders with each other. I have a deep connection with both these places. While I was born and brought up in Rajasthan, I did my graduation and eventually got married to a guy from Gujarat. If you are wondering why I am talking about this then let me tell you. My idea is to talk about one dish that is equally popular in both the states.

Sev Tamatar Ki Subji or known as Sev Tameta Nu Shak in Guajarati. I have marwadi/rajasthani style sev Tamatar ki subji before but today its Gujarati way. Now what’s the difference you ask? Well, Rajasthani one is loaded with garlic and lots of chillies. Gujarati way is sour and sweet, made with jaggery (gud). Honestly I like both the ways equally-it just depends on my mood. Mostly in Gujarat this subzi served with bhakri.


Now, sev is deep fried gram/chickpea flour vermicelli. The curry is made with garlic, chopped onions, tomatoes and Indian spices to which finally sev is added. There is no hard and fast rule on how to make the curry but I would say that please add sev just before serving otherwise it will become really soggy and mushy.

So few days back I got an email when someone asked me about the consistency of the sev Tamatar ki sabzi- well, it is again a personal choice and taste. If you like runny gravy, add more water. If you like dry, reduce the water. I like it semi-thick which means you can see the water but not too much.


Which kind of sev should you use? Any kind but which is thicker then nylon sev. Best is to use Ratlami Sev or thick sev. Here is how to make Sev Tameta Nu Shak –Gujarat Way!

Ingredients:
3 medium tomatoes, chopped finely
1 medium tomato, blended
5 cloves garlic minced or grated
1 medium size onion chopped finely
2 tablespoons oil
1/2 teaspoon cumin seeds/jeera
1/4 teaspoon turmeric/haldi
1/2 teaspoon coriander powder/dhaniya
1/2 teaspoon red chilli powder (adjust as per taste)
Salt to taste
4 tablespoons grated jagery/gud (or adjust as per taste)
2 cups water
1/2 cup sev/namkeen/bhujia
2 tablespoon chopped coriander leaves

Method:
Heat 1 tablespoon oil. Add cumin, let it splutter.
Add garlic and chopped onion. Cook for 1 minute or till onion turns soft.
Add chopped tomatoes and blended tomato.
Add the spices. Mix and cook tomatoes covered till they turn soft and mushy.
Add 2 cups or water and jaggery. Let it boil for 5 minutes.
Add sev and coriander leaves. Mix and serve.

Notes:
You can add sugar as well instead of jiggery (goor). Also please adjust the sweetens as per you taste
You can use any kind of sev-bikaneri bhujia, ratlami sev, thick sev, massala sev.
Please add or reduce water as per the consistency you decide.
Add sev just before serving.


Tuesday, March 28, 2017

Quick Pressure Cooked: Rajma Massla


What is that one advice you will like to give to someone who is attempting to cook indian food? Most of my non indian friends love to eat indian food but they never want to or are too scared to cook indian meals in their kitchen. Reason- it’s complicated. It’s no lengthy and time consuming. Well, to all those people I will opine one thing-please buy a pressure cooker.

Pressure cooker is a simple utensil that cooks food within minutes without compromising the flavours. Today’s recipe- Rajma Massala is also cooked in pressure cooker which takes half less time to traditional style rajma massla. So lets call this recipe Quick Rajma Massla.


So rajma comes from our north India/Punjab cuisine where red kidney beans are the star ingredient. The most conventional way to serve rajma is with white rice or Rajma Chawal as we call it hindi. Honestly there is nothing better then rajma chawal on a gloomy wet day. Scoops of rajma mixed with the rice is the taste I can die for.

Red kidney beans are very hard and would take hours if you are boiling it in open pan but with pressure cooker you can do it in 5-8 minutes. Also I have used only one bowl/utensil that is cooker to make this. So no kadai/wok or extra pan; just throw everything in cooker, wait for whistles and you are good to go.

Ingredients:
1 cup red kidney beans/rajma
3 cups water
2 tablespoon oil
2 medium tomatoes
1 onion, finely chopped
2 cloves garlic, finely chopped
1 inch ginger, finely chopped
2 green chillies slited
2 cloves/laung
1 bay leaf/tej patta
1/4 teaspoon cumin/jeera
1 teaspoon coriander powder/dhaniya powder
1/2 teaspoon red chilli powder/lal mirch
1/4 teaspoon turmeric/haldi
1/4 teaspoon garam massala
Salt to taste
Coriander leaves chopped, for garnish


Method:
Soak rajma beans overnight. Next day drain the water and set the beans aside.
Heat oil in cooker. When oil gets hot add bay leaf, cloves and cumin seeds. Cook for 5 seconds. Turn the flame to low.
Add in it chopped garlic and onion. Cook till onions become pinkish-brown.
Add in chopped tomato, salt, turmeric, coriander powder, red chilli powder, garam massala and green chilli. Mix well.  Add 1/2 cup water. Cook for 1 minute or till you hear your pressure cooker is just about to whistle.
Open the cooker carefully. Add in remaining water and beans. Cook on medium-low flame till 7-8 whistles.
When the pressure is released, open the cooker. Mash some beans with a spoon to get thick consistency.
Garnish with ginger and coriander leaves.
Serve hot with steamed rice.


Notes:
Instead of garam massala you can use rajma massla mix (available in Indian stores as well)
Please feel free to add more red chilli powder as per your taste

The quantity of water will depend on the size of your pressure cooker.

Tuesday, July 26, 2016

10 Minute Chickpeas Curry: Everyday Kind Of Curry


Its believed in the UK that Indian curry and beer is the match made in heaven. And if you are in London and have ever been to any of the curry houses (read brick lane) you would know the popularity of this pair. The British love affair with curry stretches back over 200 years, with the first curry house opening in London at the start of the 19th century. In every curry house, on each table you will find poppadoms, chutneys, Indian curries, naan, rice and bottle of a chilled beer. The rich, fiery zing of a fragrant curry balances well with a glass of cool and crisp beer, and thats why Indian curries and beer are sooooooo good together.

To celebrate summer in Indian style guys at kingfisher sent me kingfisher beer. Here is the Kingfisher Story:Established in Mysore, Bangalore in 1857.  Kingfisher has risen from a soldier’s tipple to a nation’s pride and joy. Kingfisher is India’s No.1 beer and is one of the country’s most heralded exports.  Now brewed in Britain, this triumphant tipple can trace its roots all the way back to 1857 when Castle Breweries first started brewing in the majestic city of Mysore. As it has grown, the beer has become synonymous with the exciting side of Indian life.  It is a sponsor of the Bangalore Royal Challengers, the Force India Formula 1 team and countless music festivals. More on http://www.kingfisherbeer.co.uk/welcome


Make it an Indian summer with kingfisher- celebrate in the sunshine with the real taste of India. Spice it up or cool it down this summer with Kingfisher. Crisp, clean and unfailingly refreshing, it’s a top choice for summer, whether you’re having a BBQ with the boys, enjoying a summer of sport or looking for a perfect curry companion. With its deft balance of light bitterness and subtle citrus flavors, Kingfisher is the perfect partner to Indian food.


My idea of an Indian summer with an Indian beer was lazy kind of a meal. Just a can of chickpeas with some spices and this curry gets ready in a jiffy. Serve it along some naan or jeera rice and you are good to go. Preparing chickpeas curry from scratch is elaborated process. Overnight soaking of chickpeas and then boiling it the other day needs lot of preparations but using canned chickpeas (garbanzo beans) is faster.


Honestly I don’t know what to name this curry. Its not Kadai chole (Punjabi north indian curry) nor it is channa masala (dry chickpeas curry). So let’s call it 10 Minute Chickpeas Curry. Yeah that’s about it. No planning at all. No grand affair in this curry- a homely or an every day kind of a curry is what you can call it. If you have less time or just don’t want to slave yourself in the kitchen that do try this curry, I promise you will be hooked.


Ingredients:
1 can of chickpeas
2 cloves garlic
1 inch ginger piece
1 onion chopped
1 tomato
2 tablespoon oil
¼ teaspoon cumin seeds/jeera
1 bay leaf/tej patta
1 inch cinnamon/dal chini
2 cloves/laung
1/4 teaspoon turmeric/haldi
½ teaspoon red chilli powder (to taste)
1 teaspoon coriander powder/dhaniya powder
1 tablespoon lemon juice
¼ teaspoon sugar
Salt to taste
1 teaspoon kasuri methi

Method:
In mixer or grinder. Grind ginger, garlic, onion and tomato in fine paste.
Strain water from chickpeas and keep it aside.
Heat oil in a pan and add cumin seeds. Let it splutter. Reduce the heat to medium-low.
Add bay leaf, cinnamon and clove. Roast for 20 seconds.
Add the grinded paste with 1 cup of water. Mix.
Add in all dry spices- salt, turmeric, coriander powder, sugar and red chili powder. Mix. Cover and let it cook for 5 minutes.
Mix chickpeas and lemon juice. Add 1 cup of water. Cover and let it boil for 2 minutes.
Finally mix kasuri methi and serve.


Kingfisher comes available in 330ml or 650ml bottles (4.8% ABV), perfect for sharing with a fortuitous friend.  Buy as a four pack or stock up the fridges with case of 12 (650ml) or 24 (330ml) bottles.  Find in-store at Tesco, Asda, Sainsbury’s and curry houses across the country or online at www.kingfisherbeer.co.ukDrink responsibly, details on-https://www.drinkaware.co.uk/


Disclaimer: I was not paid or told to write positive review. The post is based on my experience and is unbiased. Thanking Kingfisher  for sending the beers for review. 


Monday, January 18, 2016

Sev Tamatar: Sev Tomato: Rajasthan/Marwadi Style


Its super cold in London. No I am not kidding. The other day while coming back from office the wind was so harsh and cold I thought I will die before I reach home. I had my jumpers on, a thick black overcoat buttoned up and long boots, all sorted. But the wind was unkind and stony. It blew my hair in the cruelest way possible, slapped on my face, my fingers were numb and ears shocked. With all struggle I finally reached home. Home sweet home. Ah these winters make me so angry and lazy. What shall I cook for dinner-my next battle!

Quick look in the fridge, the chapatti dough was ready. So let’s make some quick lazy subji/curry. There you go; no veggies in the fridge-another challenge for the day. First I thought to make my favorite papad ki subji, the no veggie curry but then I saw a packet of namkeen, and it had to be Sev Tamatar Ki Subji-the Rajasthani or marwadi style. So what is sev- sev is spicy fried gram flour noodles. It can be eaten just like a snack. The packets are easily available in any indian store and if you haven’t you MUST try it.


More Rajasthan/Marwari Subji (curry):

Sev tamatar ki subji is sev and tomato curry. Two types are famous- the gujarati style which is called as sev tameta nu shak and rajasthani style. Gujarat curry is bit tangy and sweet, whereas rajasthan is spicy and hot. Born and bought up in rajasthan this curry is very special to my heart. The days when mom had less mood to cook, was not well or no vegetables were available this curry came in handy. She would ask my father or brother to buy a packet of namkeen and then start preparing for the subzi. In this recipe you can use ratlavi sev, moti sev, spicy sev or even garlic (lehsun) sev. I have used Kohinoor bhujia sev.


You just need basic Indian spices, garlic, tomatoes and sev. It took me 10 minutes in total to prepare this curry. Served it with some Indian kachumber salad and chapatti. The dinner was enjoyed and I was bit ok with novelty of winters.

Ingredients:
1 and 1/2 cups Tomatoes chopped finely
5 cloves garlic minced or grated
1 medium size onion chopped finely
2 tablespoons oil
1/2 teaspoon cumin seeds/jeera
1/4 teaspoon turmeric/haldi
1/2 teaspoon coriander powder/dhaniya
1/2 teaspoon red chilli powder (adjust as per taste)
Salt to taste
Pinch of sugar
2 cups water
1/2 cup sev/namkeen/bhujia
2 tablespoon chopped coriander leaves

Method:
Heat 1 tablespoon oil. Add cumin, let it splutter.
Add garlic and chopped onion. Cook for 1 minute or till onion turns soft.
Add chopped tomatoes and all the spices. Mix and cook tomatoes till they turn soft and mushy.
Add 2 cups or water and sugar. Let it boil for 5 minutes.
Add sev and coriander leaves. Mix and serve.


Notes:
Add sev just before serving else it will become soggy.
I have used kashmiri red chilli powder, it gives good colour but is not very spicy.